Showing posts with label Ribbon. Show all posts

Saturday, April 11, 2020

Gift Boxes with Pebbles Hey, Hello

Hello blogging friends!

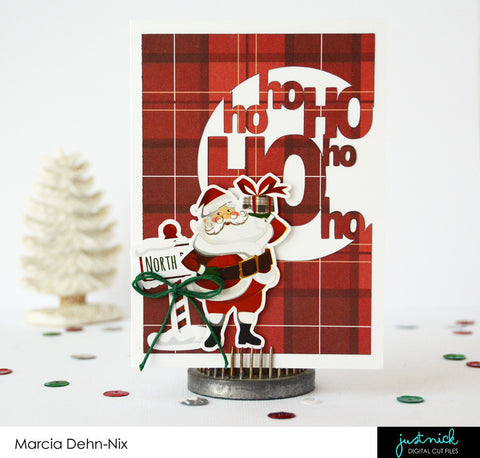
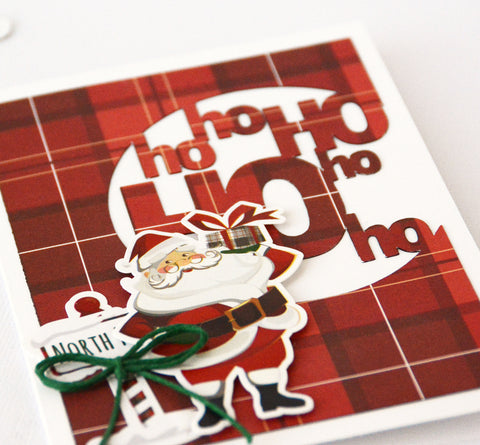
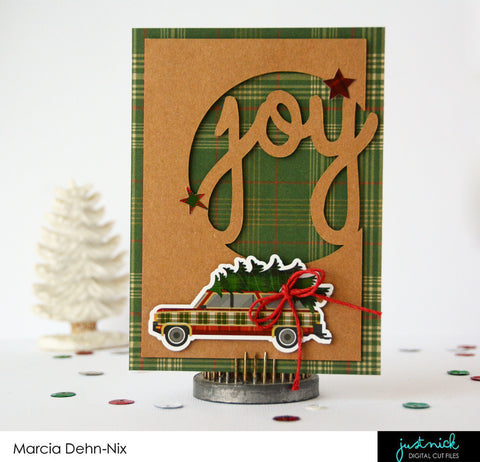
With most people around the world right now sheltering in place to help reduce the spread of coronavirus, no birthday parties or wedding receptions or baby showers or celebrations of any kind involving groups of people are happening. I want to make sure some special people in my life still feel loved even if we cannot be together for special events. My Mother-in-law just turned 80 and I couldn't even give her a hug! I decided to make some little gift boxes to deliver to some special people with some goodies inside. I used two coordinating sheets of 12x12 of pattern papers from the beautiful Hey, Hello collection and decorated my boxes with tags that can be cut from pattern paper. Boxes are easy to make. I used a cut file from SVGcuts , but they can also be made without using a cutting machine.


The Hey, Hello collection is perfect for special occasions of all kinds, like birthdays.


There is plenty of room inside for cupcakes, donuts, or cookies.


Layer up a couple tags and a ribbon on the top to make your box so festive looking.


This next gift box could be used for a birthday as well, but I'm giving it to a girl who will be graduating from high school. Commencements have been canceled. I can put candy, gift cards, or cash inside.


I added a tag cut from pattern paper to the top along with a die cut phrase ephemera piece and some ribbon.


But don't think this collection is just for kids... This beautiful floral box went to my Mother-in-law. It would be perfect for Mother's Day too. There are lots of other beautiful floral papers that would make lovely gift boxes.


I put her favorite chocolates inside. Once again I adorned my box with ribbon, a tag, die cut ephemera, and cut paper leaves.


Do you have anyone special you can't be with right now? Why not create a special gift box for them. You don't need a special occasion to tell someone your thinking of them.


Supplies:
Pebbles – Hey, Hello – 12 x 12 Paper Pad
Pebbles – Hey, Hello – 12 x 12 Patterned Paper Cupcake Surprise
Pebbles – Hey, Hello – 12 x 12 Patterned Paper Donuts
Pebbles – Hey, Hello – 12 x 12 Patterned Paper Yellow Roses
Pebbles – Hey, Hello – 12 x 12 Patterned Paper Blushing Hedgehogs
Pebbles – Hey, Hello – 12 x 12 Patterned Paper Floral Friends
Pebbles – Hey, Hello – 12 x 12 Patterned Paper Girlfriend Sentiments 

Pebbles – Hey, Hello – 12 x 12 Patterned Paper Birthday Sentiments 
Pebbles – Hey, Hello – 12 x 12 Patterned Paper Thinking Of You Sentiments
Pebbles – Hey, Hello – Die Cut Ephemera


Thanks so much for stopping by today.
~Marcia

Friday, November 22, 2019

Vintage Truck Holiday Gift - Jillibean Soup

Hello blogging friends!

My husband is restoring an old truck...  ok, so maybe not so much restoring right now as the truck is in pieces in our garage! I hope the restoration will start soon. Anyway, when I say this Vintage Truck svg from SVGcuts, I knew I had to make it. The old guy's birthday is coming up after all. But I discovered that a small loaf of banana or pumpkin bread fits in the truck bed perfectly and I thought it would also make a really cool hostess gift. I guess I'll need to make a few more of these.

I used a Jillibean Soup digital cut file available in the Silhouette Store and printed it on vellum for my truck's door signs. Jillibean Soup has lots of cut files you could choose from. I opted for the dairy sign as my father grew up on a dairy farm, but there are pigs, chickens, cow, flower signs as well.


Of course you want a hostess gift to look pretty too so I added a Jillibean Soup shaker tag and huge bow to the bread bag. Here too I used another Jillibean Soup digital cut file and printed it right on the tag. It looks like I stamped it! I filled the shaker with two shades of blue beads. I didn't want to cover up the words though.


I love how this turned out. It even has headlights and taillights!. Be sure to check out SVGcuts because their 3D cut files will astound you.


Thanks so much for stopping by!
~Marcia


Saturday, October 5, 2019

Cardmaking with Peek-A-Boo You | Pebbles

Hello blogging friends!

I am celebrating World Cardmaking Day today with some adorable cards I created with the new Pebbles Peek-A-Boo You collection. This collection is perfect for baby boys and girls.


Cardmaking is easy when you can cut journal cards from pattern paper as I did here. The card sentiment is already there for you so you don't need stamps either. This first card uses just one pattern paper for the background. I used some metal dies to give this stork journal card a unique shape as well as for the doily I layered underneath. A pretty bow and some washi tape add a few more delicate details.


Cardmaking doesn't need to be hard. For this card I picked two pattern papers that coordinated well together to create this card background and placed a journal card on top. I added a delicate butterfly to accent the card sentiment.


How about three pattern papers... I used two for the background and added a third for the scallop punched border. Some ribbon, butterflies, and sprigs of leaves are perfect for baby girl cards.


Thank you so much for stopping by today!
~Marcia


Supplies:
734198 Peek-A-Boo You - Girl - Follow You Dreams
734203 Peek-A-Boo You - Girl - Special Delivery
734200 Peek-A-Boo You - Girl - Little One
734201 Peek-A-Boo You - Girl - Baby Love Girl
734204 Peek-A-Boo You - Boy - Adventure Calls
734205 Peek-A-Boo You - Boy - Jungle Stripes
734206 Peek-A-Boo You - Boy - Be Wild
734207 Peek-A-Boo You - Boy - Baby Love Boy
734209 Peek-A-Boo You - Boy - Jungle Adventure
736760 Peek-A-Boo You - Girl - Washi Tape

736763 Peek-A-Boo You - Girl - Stamps
Sticky Thumb DotsSticky Thumb Tape Runner

Friday, April 26, 2019

Happy Glamping - Pebbles

Hello blogging friends!

The DT coordinator over at Pebbles asked the designers if we like to create home decor or papercraft items. Of course I said yes! I even suggested I could make a camper (using the SVGcuts Camp Firefly cut files). Well that led to Jen Hadfield (yes, the Jen Hadfield!) asking if I could put the camper inside a wreath! Who knew people did this? I had to look on Pinterest for examples. Well now I am guest designing for Jen Hadfield! Here is the post I sent her...

The warmer weather has my family thinking about future camping trips. We love to pack up the car and drive to one of our favorite camping spots ... or even to explore a new place. With the glamping craze, I thought maybe I should be decorating our camper ... so I decided I needed to make a wreath for the camper door. Here is what I came up with.


This wreath was super easy to make. It took 2.5 rolls of burlap and maybe 15 minutes! Here is a tutorial I found on YouTube to explain how to create this beautiful ruffle wreath. Well then I had to think about how to decorate my wreath. I found a svg design for the camper from SVGcuts. It's a 3 dimensional camper complete with a lawn flamingo in the front! I made my camper using pattern papers from Jen Hadfield's Chasing Adventures collection. The hiking girl standing in front is an extra nice touch...don't you think?


Next I had to figure out how to attach the camper to the wreath. Since the camper is make out of paper I didn't want to use wire and chance ripping the camper. I finally opted to glue the camper to a blackboard sign. Of course this left me space on the sign I had to decorate with vinyl. I found the cutest Happy Camper cut file in the Silhouette store. I love the trees and mountain scenery behind the camper.


The blackboard sign hangs from a wire at the top of my wreath. I also added a pretty pink bow too.


I love how this turned out. It will be so fun to see people's reactions when they see this beauty on our camper door!


Thanks so much for stopping by today. Where is your favorite place to go camping? I am always looking for a new adventure and would love to hear!


~Marcia


Supplies:
Chasing Adventures 12×12 Paper Pad
Chasing Adventures Ephemera Die Cuts
2.5 rolls of burlap
14" wire wreath form
wired ribbon
Silhouette Cameo
vinyl
blackboard sign
SVGcuts Camp Firefly kit
wire

Monday, March 11, 2019

Home Sweet Home - Jillibean Soup Mix The Media

Hello blogging friends!

I have a Jillibean Soup Mix The Media Home Decor piece to share with you today. I wanted to introduce more greenery into my home. Winter has been way too long here in Minnesota and March tends to be our snowiest month. I am so ready for Spring! This Mix The Media rustic pine tray was painted with a grey chalk paint, then a eucalyptus wreath was placed inside the tray along with a canvas sign, gorgeous Jillibean Soup felt flowers, and a buffalo plaid bow.


I covered the canvas with a piece of pattern paper from the Garden Harvest collection, then added this Home Sweet Home in vinyl on top. This is one of the newer Jillibean Soup digital cut files available in the Silhouette store. The purple felt flowers go with the collection's palette so well, plus purple makes me happy (really any color other then snow white makes me happy at the moment, lol), I love those 2 birds I found at a local Bachman's store to display along with my new tray. Bring on Spring!


This was super easy to make and it really adds some farmhouse freshness to my house. Thanks for stopping by.

Supplies:
Jillibean Soup
Mix the Media:  11 x 14 Rustic Pine Tray JB1380
Felt Flowers Pocket of Purple JB1432
Digital Cut Files: Home Sweet Home / Design ID # 273063


Other: Silhouette Cameo, black matte vinyl, transfer tape, Americana Decor chalk acrylic paint in grey, Americana Decor creme wax in brown, 4x6 canvas, Buffalo plaid ribbon, Pumice Stone distress ink

~Marcia

Wednesday, December 20, 2017

Holiday Cards | JustNick Studios

Hello blogging friends! 

I am here today with some Holiday card ideas (in case you are like me and still making cards to mail). The Holiday Cards 2 JustNick Studio digital cut file makes cardmaking a breeze. Add a couple stickers and some twine or sequins and they are good to go. These first 2 cards were made with  PhotoPlay Paper's Mad For Plaid Christmas collection. I just adore this Santa.


Using some Kraft cardstock on this one gives it a masculine feel. It's perfect for my  brother.


Making cards is a great way to use up some of that stash you've been hoarding too. Aren't these penguins from Doodlebug the cutest! I used some self adhesive sequins from Jillibean Soup to add some bling.


Here is the cut file I used today ...


Thanks so much for stopping by. Enjoy your Holiday with friends and family!

Tuesday, November 8, 2016

Shine Bright - JustNick Studios

Hello blogging friends!

I took a break from Fall layouts to do a girly one to share with you today. The beautiful new Fancy Floral Ring digital cut file from JustNick Studios reminded me of those flower wreaths they place over a horse's neck after they win a race. Well, I thought it would work well for this horse show picture of a friend of mine. I used a gold metallic cardstock to cut it out as I thought the pattern in the floral ring mimics the gold floral pattern in my friend's riding outfit. To keep the emphasis on the photo and floral ring, I decided to back the ring with vellum and place some shiny sequins underneath. They are kept in place by the machine stitching I added over the top of the ring. The papers and embellishments are from the Cocoa Vanilla Studios Free Spirit collection.


Here is a closer look at the Fancy Floral Ring digital cut file I used.


Just look at all the intricate details in this gorgeous cut file...


Here is the cut file I used today.


Thanks so much for stopping by! Have a great week.
~Marcia

Tuesday, October 4, 2016

May You Follow - JustNick Studios and Pretty Little Studios

Hello blogging friends!

For the next 2 weeks the JustNick Studio designers are teaming up with Pretty Little Studios to bring you such fabulous inspiration.


Today I am sharing what I created with the beautiful Pretty Little Studio Woodland collection. Using the Rustic Leaf Frame digital cut file, I created a window card. My sentiment is stamped inside the card, but you can see it through the dandelion transparency sheet. This frame was so perfect to use with these pretty outdoorsy papers.


Aren't these butterflies awesome! Here is a detail look at the Rustic Leaf Frame.


Here are the cut files I used today ...


Thanks so much for stopping by today! Stop by the JustNick Studios blog all week for more inspiration with Pretty Little Studios and a chance to win a fabulous gift card.

~Marcia

Thursday, January 21, 2016

Basic Grey Dear Heart Banner and Xyron

Hello blogging friends!

I am sharing a wedding idea today. When my daughter got married she wanted a vintage suitcase to hold the cards guests brought. I made a banner to hang on the suitcase so people would know the suitcase was for cards. It was perfect for her retro themed wedding.  Well, I've had a request to borrow the suitcase for another wedding ... I decided to make a new banner for the bride so she could keep it. I used the soft and romantic Dear Heart collection from Basic Grey and my Xyron adhesive.


I just tied the ends of the ribbon on the suitcase clips for display. This suitcase was slightly larger than a laptop bag if that gives you an idea for size.


Let me show you how I created the banner.

Supplies:
Silhouette Cameo
Digital file for the banner
Hole Punch

Step 1.  I found a banner in the Silhouette On-line Store and cut out enough for 5 pennants.


Step 2.  I ran the pink pieces and green scallop pieces though my new Xyron 9" Creative Station.


Step 3.  After adhering the pink pennants on top of the scallop base piece, I punched 2 holes at the top.


Step 4.  Weave a long piece of ribbon through each hole, leaving lots of length on both ends for hanging.


Step 5.  Adhere the green scallop border at the top over the ribbon.


Step 6.   Take a piece of white cardstock slightly wider than a small doily die and run it through a Xyron 3" Sticker Maker. I love taking these with me on crops!


Step 7.  Peel off the plastic sheet on top. Place your doily die on top and run through your die cutting machine.


Step 8.  Peel the doily off it's adhesive sheet and adhere to the banner. I love that if I apply the adhesive first and then die cut, I have no adhesive residue to clean up in the doily holes. Now place a letter sticker in the middle. Embellish with other stickers if you like.


Here is what my suitcase looks like closed. It was originally a blue suitcase. I spray painted it black. The inside was also blue and not very pretty looking. I applied some gold contact paper inside to cover up the blue and added a few stick on gems.


Thanks for stopping by today. Be sure to check out the Xyron Facebook page all week to see what our other designers have been making.