Showing posts with label Bow. Show all posts

Friday, November 22, 2019

Vintage Truck Holiday Gift - Jillibean Soup

Hello blogging friends!

My husband is restoring an old truck...  ok, so maybe not so much restoring right now as the truck is in pieces in our garage! I hope the restoration will start soon. Anyway, when I say this Vintage Truck svg from SVGcuts, I knew I had to make it. The old guy's birthday is coming up after all. But I discovered that a small loaf of banana or pumpkin bread fits in the truck bed perfectly and I thought it would also make a really cool hostess gift. I guess I'll need to make a few more of these.

I used a Jillibean Soup digital cut file available in the Silhouette Store and printed it on vellum for my truck's door signs. Jillibean Soup has lots of cut files you could choose from. I opted for the dairy sign as my father grew up on a dairy farm, but there are pigs, chickens, cow, flower signs as well.


Of course you want a hostess gift to look pretty too so I added a Jillibean Soup shaker tag and huge bow to the bread bag. Here too I used another Jillibean Soup digital cut file and printed it right on the tag. It looks like I stamped it! I filled the shaker with two shades of blue beads. I didn't want to cover up the words though.


I love how this turned out. It even has headlights and taillights!. Be sure to check out SVGcuts because their 3D cut files will astound you.


Thanks so much for stopping by!
~Marcia


Friday, April 26, 2019

Happy Glamping - Pebbles

Hello blogging friends!

The DT coordinator over at Pebbles asked the designers if we like to create home decor or papercraft items. Of course I said yes! I even suggested I could make a camper (using the SVGcuts Camp Firefly cut files). Well that led to Jen Hadfield (yes, the Jen Hadfield!) asking if I could put the camper inside a wreath! Who knew people did this? I had to look on Pinterest for examples. Well now I am guest designing for Jen Hadfield! Here is the post I sent her...

The warmer weather has my family thinking about future camping trips. We love to pack up the car and drive to one of our favorite camping spots ... or even to explore a new place. With the glamping craze, I thought maybe I should be decorating our camper ... so I decided I needed to make a wreath for the camper door. Here is what I came up with.


This wreath was super easy to make. It took 2.5 rolls of burlap and maybe 15 minutes! Here is a tutorial I found on YouTube to explain how to create this beautiful ruffle wreath. Well then I had to think about how to decorate my wreath. I found a svg design for the camper from SVGcuts. It's a 3 dimensional camper complete with a lawn flamingo in the front! I made my camper using pattern papers from Jen Hadfield's Chasing Adventures collection. The hiking girl standing in front is an extra nice touch...don't you think?


Next I had to figure out how to attach the camper to the wreath. Since the camper is make out of paper I didn't want to use wire and chance ripping the camper. I finally opted to glue the camper to a blackboard sign. Of course this left me space on the sign I had to decorate with vinyl. I found the cutest Happy Camper cut file in the Silhouette store. I love the trees and mountain scenery behind the camper.


The blackboard sign hangs from a wire at the top of my wreath. I also added a pretty pink bow too.


I love how this turned out. It will be so fun to see people's reactions when they see this beauty on our camper door!


Thanks so much for stopping by today. Where is your favorite place to go camping? I am always looking for a new adventure and would love to hear!


~Marcia


Supplies:
Chasing Adventures 12×12 Paper Pad
Chasing Adventures Ephemera Die Cuts
2.5 rolls of burlap
14" wire wreath form
wired ribbon
Silhouette Cameo
vinyl
blackboard sign
SVGcuts Camp Firefly kit
wire

Saturday, March 16, 2019

Live Simply - Simple Stories

Hello blogging friends!

I am back today with a Simple Stories Spring Farmhouse layout for you. This is such a gorgeous collection! I love all the flowers with the spring color palette. The black in the collection really sets off all the soft pastel colors. For me, it is so much needed after a hard winter that just doesn't want to go away any time soon. I knew immediately what photo I wanted to scrap. My niece had a senior photo taken outside where she is lounging in a chair. She lives in the country, so the field behind her and the chair give the photo a homey quality, just perfect for the farmhouse feel of this collection.


I started out with the Love This Life pattern paper for my layout base, then placed a strip of the black floral Love A Lot pattern paper down the middle of my page. To add a little warmth, I added a yellow punched border on both sides. To help my photo stand out against the pattern papers, I put a pretty doily behind the photo. I love how the doily mimics the lace in my niece's shirt.


Spring calls for flowers, so I added some along both sides of my photo. The Live Simply sticker was perfect for a title. I put some foam behind it to give it some dimension. In the bits and pieces ephemera pack was this pretty pink gingham frame which worked perfectly around this fabulous bicycle with quote sticker. I also tucked in some die cut leaves and this cute little bird from the chipboard sticker sheet. A twine bow adds to the farmhouse feel. Isn't this a gorgeous cluster of embellishments!


Did you also see the beautiful bow clips in this collection? I used the pink gingham bow to match the frame I used in my large embellishment cluster and placed it at the top of my photo.


More flowers and a chipboard frame make up a smaller embellishment cluster to the right of my photo.


Don't fall over or anything ...  I even have a process video for this layout!! Stop by and subscribe to my channel.


You don't need to live in the country to appreciate this gorgeous collection. It is versatile enough to be used for your everyday photos at home too. I think I have a new favorite collection! Thanks so much for stopping by!

Supplies:


Saturday, February 23, 2019

Winter Wonderland | JustNick Studios

Hello from snowy Minnesota today!

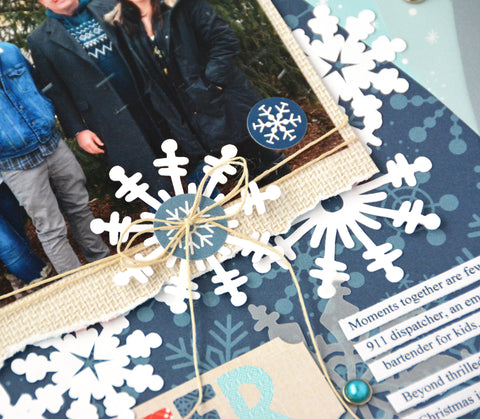
We are still digging out from our latest snowstorm...  and getting ready for another 4"-8" over the weekend. How fitting that my JustNick Studio layout today is a winter one. I really wanted to get this family photo scrapped before spring settled in and we were all sick of winter. (Ok... some of us are already sick of winter!) Check out my layout anyway. I used the Echo Park Celebrate Winter collection...


I used the Snowflake Cluster cut file to ground my photo. The white snowflakes make quite an impact against the dark background.


I wanted to scatter a few more snowflakes onto my page and discovered the Snowflakes 2 cut file has some of the same snowflakes! I cut them out twice, once with white cardstock, then again with vellum. The vellum snowflakes soften my page a bit and I could add a layer of snowflakes over my photo as well.


Along the right side of my layout I arranged a variety of papers and vellum with lots of curvy edges. I wanted you to think blowing snow when you saw it. Here I layered some of the white and vellum snowflakes to create this beauty!


I love how this turned out ... maybe more so because my favorite people are in this photo.


Here are the cut files I used today ...


Thanks so much for stopping by today. If it's snowing where you live, get outside and snap a few photos! There are plenty of winter cut files in the store that are perfect for documenting them.

Monday, August 11, 2014

Washi Tape Gift Wrap - Love My Tapes

Hello blogging friends!  I have an awesome Love My Tapes washi tape gift wrap idea to share with you. Did you know that washi tape is a fabulous way to add pizzazz to a wrapped gift. I was headed to a wedding shower last Sunday and thought my gift wrapped package was boring. Plain silver paper and I didn't even have a bow. Then I remembered I had this incredible wedding themed washi tape. Washi tape to the rescue! Take a look at my gift now ...


Want to see how I made that bow?  I thought you would.

1. I applied washi tape to white cardstock and trimmed the cardstock into strips.


2. Glue the strips so you have 3 loops about the same size. You will also need one smaller loop for the top of the bow. 


3. Arrange washi bands on top of each other and put a staple or two through the middle.


4.  Add some twine loops too if you want. Then tape the smaller loop on top.


Well the bride is a scrapbooker and was so thrilled with the gift wrap that she saved the wrapping. That washi tape will peel right off when she is ready to use it on a layout :)  I love my Love My Tapes washi tapes!!!

I hope you will be adding some pizzazz to your own gifts that need wrapping. Have a great week!
~Marcia