Showing posts with label Christmas. Show all posts

Saturday, November 9, 2024

November Layout Share - My Creative Scrapbook

 Hey everyone. I am so excited to share my layouts created with the November Main kit from My Creative Scrapbook. This amazing kit featured the Santa's Village collection from Simple Stories along with some Echo Park Paper chipboard, stickers and die cut ephemera. Every month the kit also includes a sketch and digital cut files from the Cut Shoppe. Here's what I created ...

1. Christmas Spirit - This layout was created with the monthly sketch by Laura Whitaker. 


The circles on the background had me wanting to try to create my own mixed media background, very much like the 49th & Market Painted Foundations background. My YouTube video will show you how to create one too...


2. Home For The Holidays - Since I was on a mixed media background roll, I decided to make another using the Simple Stories stencil that was included in the kit. I also used the Gingerbread House and Home For The Holidays cut files from The Cut Shoppe that are included in your kit subscription.


3.  North Pole - I had to scrap a photo of my grandson visiting Santa for the first time.


4.  Merry Christmas features our dogs enjoying their Christmas presents. I don't think Allie approves of her naughty scarf.


My Creative Scrapbook puts together 4 kits every month. I used the Main kit for these layouts. Each kit is put together beautifully. There is really something for every kind of scrapbooker! Go check them all out.

Thanks so much for stopping by.
~Marcia


Monday, December 25, 2023

Holiday Cards - Lori Whitlock

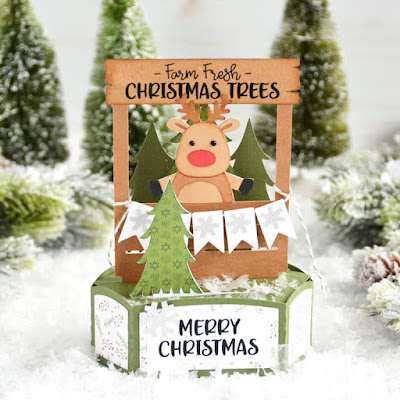
 Hello everyone! Marcia here today. I have some holiday cards to share with you today. No, it’s not too late to make and send holiday cards! New Year is a holiday so for me, it’s ok to send a card after Christmas. I love to send holiday cards to friends and family as well as receive them. I especially love a box card that can sit on a tabletop or counter and doubles as home decor. This Hexagon Pop-Up Christmas Tree Booth With Reindeer Card (SVGSilhouette)  and the Hexagon Pop-Up Santa's Workshop Card (SVGSilhouettecut files can be found in Lori’s Store along with many other varieties of holiday cards. I used the new Echo Park Paper Have A Holly Jolly Christmas collection.


Stop by the Lori Whitlock YouTube channel for  tutorial instructions on how to assemble the hexagon pop-up cards. Don’t worry about how you will mail it, because these awesome cards fold flat for mailing.
 
Thanks so much for stopping by,
~Marcia

Thursday, December 14, 2023

Santa Lighted Shadowbox Decor - Lori Whitlock Tutorial

 Hello friends. 

I am sharing a tutorial on the blog today for the new Holiday Lighted Shadowbox Decor pieces. You can purchase a bundle Here that includes a Turkey, Santa, Reindeer, Elf, Snowman, and Nativity Scene. I made the Santa (SVG, Silhouette) and boy is he spectacular!


These are pretty easy to assemble. Let me show you how.

1. Cut out all the pieces from desired pattern paper or cardstock. Be sure to scroll in Silhouette Studio to see all the pieces. There are 4 inserts, side panels, and the decorated front and back. We are going to assemble the side and back first Adhere your pattern paper panels to the cardstock back and sides.


2. Glue one side panel in place, adhering it to the tab with the four slits and then each tab working your way around to the other tab with four slits on the opposite side
.

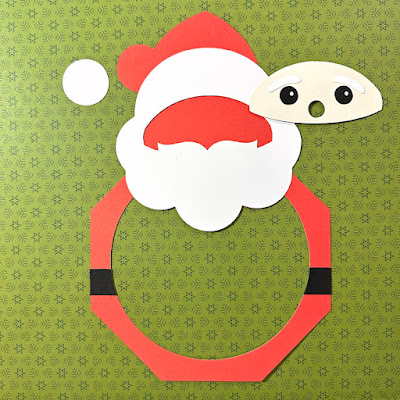
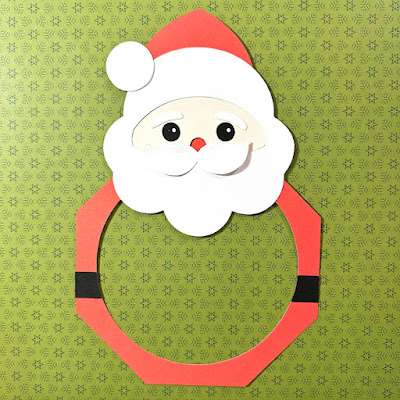
3. Let's assemble the front panel. We are going to start with Santa's face. The white paper goes behind the black. That goes behind the flesh colored face. Last, attach his eyebrows over each eye.


4. Adhere the black belt pieces on each side and the bottom of the beard. This allows you to fit the face piece in just so tucked under the mustache. Once the face is in there, go ahead and adhere the hat brim down along with the white pompom. Lastly, add the mustache.


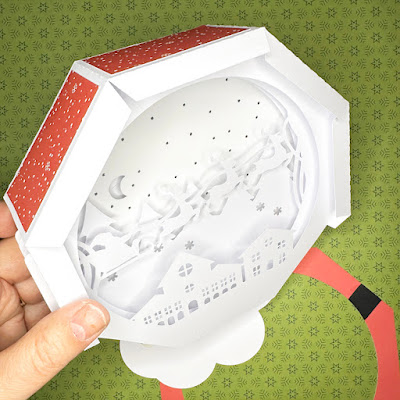
5. We are ready to assemble the inside of the shadowbox. Take the back panel with the moon and start and slide the tabs through the slit in the back on each side. You want the hole in the back piece to be on the bottom.

6. Repeat with the other inserts.


7. Once the inserts are in place we can adhere the final side in place the same as the other side.


8. Adhere the front Santa panel to the front of the shadowbox. I did this a few tabs at a time. Then your Santa is ready for some lights or if you prefer you can leave it as is.


Thanks so much for stopping by. Be sure to check out all of Lori's latest designs in her shop.
~Marcia

Friday, December 8, 2023

December Layout share - My Creative Scrapbook

Hello friends.

The My Creative Scrapbook December Main Kit featured the vintage Simple Stories Dear Santa collection and a few pieces of pattern paper from the Memory-Place Dear Santa collection. The kit was also packed with embellishment options from 49th & Market Christmas Spectacular and Echo Park Paper Santa Claus Lane. It was a joy to create with this kit! Let me show you what I made.

1. Farm Fresh Christmas Trees - This is a great design to use for paper scraps. I wanted to create a layout that made use of the Christmas Tree Farm embellishments. Watch my YouTube process video here...


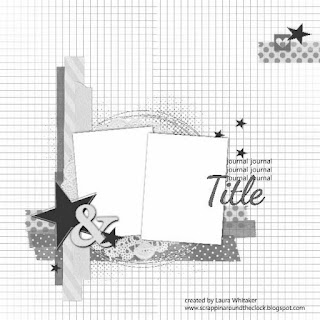
2. Jingle All The Way - I use the monthly sketch by Rebecca Moore for this next layout. But 3 small photos and lots of white space scared me. So this layout went in a different direction. Here is the sketch.


Watch my YouTube process video to see my take on the sketch.


3. Jolly Holiday - There were actually two sketches this month. Laura Whitaker designed this one.


My daughter recently added an English Golden Retriever puppy to her family and sent me these adorable snapshots I couldn't wait to scrap. Here is my take on the sketch.


4. Merry & Bright - I used the "25" digital cut file from The Cut Shoppe which was included in the kit subscription. These photos were from two years ago. You can see even our cat wanted to be part of the family photo. He was perched on my son's shoulders.


My Creative Scrapbook puts together 4 kits every month. This is the Main kit that I used. Each kit is put together beautifully. There is really something for every kind of scrapbooker! Go check them all out.

Thanks so much for stopping by,
~Marcia


Thursday, November 23, 2023

Santa Gift Card Tag Tutorial - Lori Whitlock

 Hello friends.  Christmas is creeping up. I am a big fan of giving gift cards so my recipients can pick out their own gift but I like to make gift card holders to put them in. I selected the Gift Card Tag Santa (SVGSilhouette) to make for my gift cards this year.  There is a pocket on the back side of this tag that holds the gift card. I used Lori's Have a Holly Jolly Christmas collection to create my tags.


These are really easy to assemble. Let me show you how.

1. Cut out the pieces from desired pattern paper or cardstock.


2. Fold the tag along the score lines folding the flaps up. Apply glue to the flaps and adhere to the back of the tag to form the pocket.
 

3. Adhere the white beard and Santa suit trim to the top of the tag.


4. Slip the black belt through the belt buckle and adhere to the bottom of the tag. Add the two black buttons above the belt on the white trim.
 

5. Add ribbon or other embellishments as you wish.


Check out Lori's other gift card holder designs in the store and make some of your own. Thanks so much for stopping by.
~Marcia

Monday, November 20, 2023

November Layout Share - My Creative Scrapbook

 Hello friends.

The My Creative Scrapbook November Main Kit featured the festive Paige Evans Sugarplum Wishes collection and a few pieces of pattern paper from Vicki Boutin's Peppermint Kisses collection both from American Crafts. It was a joy to create with this kit! Let me show you what I made.

1. Hittin' The Slopes - My first layout uses the monthly sketch from My Creative Scrapbook which was created by Rebecca Moore. I used the Vicki Boutin pattern papers here and added more snowflakes using the acrylic stamp that was included in the kit. The canvas flair in the lower right is from Scrappin' Happy Studio. Check out my YouTube video for all the details.


2. Visiting Santa - The Sugarplum Wishes collection included a full 12x12 sheet of foam stickers. The Santa sticker needed to be used on a page about visiting the jolly old guy. I dug out some older photos of my kids. These were taken while we were waiting in line to visit Santa. I know you can make appointments for Santa now, but back in the day it wasn't unusual to wait an hour or more. 

3. Home For The Holidays - This layout features the Home For The Holidays cut file from The Cut Shoppe that is included with your kit subscription. I used the Vick Boutin stencil also included in the kit to create my mixed media background. It was perfect to help offset my title. The photos are from our last Christmas so you can see my kids aren't so little anymore and are starting families of their own.


4. Merry Christmas - My last layout is another mixed media ombre page using the Snowflake Background cut file from The Cut Shoppe which is included with the kit subscription. I framed a photo with a foam sticker from the sticker sheet and then surrounded it with beautiful poinsettias and snowflakes. 

My Creative Scrapbook puts together 4 kits every month and in December there is even a kit for a December Daily. There is really something for every kind of scrapbooker! Go check them all out.

Thanks so much for stopping by,
~Marcia


Monday, November 13, 2023

Christmas Card Trio - Lori Whitlock Blog Hop

 Hello everyone! It's blog hop time at Lori Whitlock.


Here is the blog hop order in case you want to start at the top or get lost along the way...

I have yet to make a Christmas card this year so I thought I should get my act together. I made a trio of cards from the Pop Dot Christmas Card Bundle (SVG). You can also purchase the cards separately here; Santa Pop Dot Christmas Cars (SVG, Silhouette), Reindeer Pop Dot Christmas Card (SVG, Silhouette), and The Snowman Pop Dot Card (SVG, Silhouette). I used the new Lori Whitlock Have A Holly Jolly Christmas and the Magic of Winter collections. All of these cards fit into an A2 size envelope.


Aren't they all adorable! Go check out all of Lori's latest Christmas designs if you need to make some cards like me. Right now Lori's designs are 30% off!!!!!  Use code Nov2023 to get 30% off all SVGs, Fonts and Commercial Licenses!


Want to win a gift card to Lori’s Shop? Enter here… 


Thank you so much for stopping by,

~Marcia