Showing posts with label Wedding. Show all posts

Monday, October 11, 2021

True Love - Lori Whitlock Blog Hop

Hello everyone! It's blog hop time at Lori Whitlock!


Here is the blog hop order in case you want to start at the top or get lost along the way...

My niece recently got married and I wanted to make her a special card. I decided on the Hexagon Pop Up Card Valentine Couple, making a few changes to it so that I could use it for a wedding (SVG,Silhouette). Really the only change needed was to omit the Valentine sentiment on the front of the card base. I used the pretty Lori Whitlock Our Wedding collection.


Go check out all of Lori's new designs and while you are at it, grab this FREE cut file! No code or minimum purchase required.


Did I mention all those designs are 30% off!!!!!  Use code Oct2021 to get 30% off all SVGs, Fonts and Commercial Licenses!


And finally, how would you like to win a $20 Coupon to the Lori Whitlock SVG Shop?


Thanks so much for stopping by. Head over to Brigit Mann next.
~Marcia

Monday, January 11, 2021

Newlywed Card - Lori Whitlock Blog Hop and Giveaway!

 Hello blogging friends!

It's time to hop again this month and see all the amazing Lori Whitlock creations the designers are making.


You should have arrived here from Michelle Starcher's blog for those hopping. Here is the hop order in case you are just arriving here and want to start at the beginning.

Marcia Dehn-Nix <--- You are here!

I have a February wedding coming up, so I thought I should make a wedding card. I decided on this Newlywed Easel Card (SVG, Silhouette). Here it is open.


I used the new Lori Whitlock Our Wedding collection and a silver metallic cardstock to add some bling.


Here is what it looks like closed. So cute!


There's a sale happening in the Lori Whitlock SVG Shop!  Use code Jan2021 to get 30% off all SVGs, Fonts and Commercial Licenses!


and who doesn't love a FREE cut file!!!! This file is free for today only!  No code or minimum required.


Finally, how would you like to win a $20 coupon to Lori's SVG Shop! 

Just click on the Rafflecopter giveaway.

a Rafflecopter giveaway

~Marcia

Monday, November 12, 2018

Love Story - JustNick Studios

Hello blogging friends!

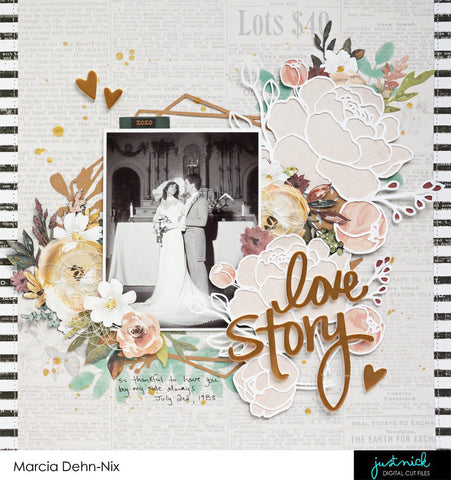
This week on the JustNick Studio blog we are posting projects with the theme Thankful. I know with Thanksgiving approaching we are thinking about all the things we are thankful for; family, jobs, health ...  My hubby just had surgery recently to repair a hernia (nothing too serious). I am thankful that I have had this wonderful man by my side for 35 years so I decided to scrap one of our wedding photos. (Don't laugh too much about my 80's hair and hat. lol. I converted the photo to black and white so you can't tell that his tux is baby blue) I used the gorgeous Pink Paislee Auburn Lane collection.


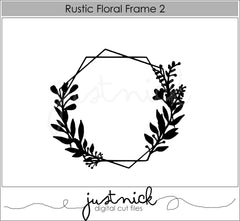
I used the new Rustic Floral Frame 2 and cut it out in a metallic gold to frame my photo. Then I added two of the new Rose Clusters backed with pretty pink pattern papers.


To add some depth, I used the Stems 2 digital cut file as a stencil behind the rose clusters as well as under some fussy cut flowers.


Here are the digital cut files I used this week...


Thanks so much for stopping by today. Did I get you thinking about what you are thankful for?

Monday, February 20, 2017

Champagne Brunch Bridal Shower - Stash Bash YouTube Hop

Hello blogging friends!

Marcia here today with my second Stash Bash YouTube process video in our monthly series. Each month some of my scrappy friends and I choose one element in our stash and create scrapbook layout focusing on that item. This month it was gemstones, enamel dots, sequins ... I went with gemstones. I have been wanting to scrap my daughter's bridal shower pics for a while now. I really debated whether to scrap these photos at all since my daughter is now divorced. But I figured her ex is not in the photos, and it was a really fun day with family and friends. We had a champagne brunch with a Breakfast at Tiffany's theme ... so much fun. We asked guests to come dressed as Audrey Hepburn ... elegant black dresses with pearls and hats. I intend to turn this layout into a 2 pager I think. I used the gorgeous Metropolitan Girl collection from Carta Bella paper


 What do you think of that chandelier?  I used my Imaginisce i-rock and rhinestones to add bling. I love the way it turned out.


There is more bling at the bottom ... this gorgeous swirl from Want 2 Scrap.


I adore the vintage feel to this collection. It was perfect for the Breakfast at Tiffany's theme.


I used a silver metallic thread to add some stitching here. I love mixing fonts for my titles.


and my beautiful girl...


Thanks so much for stopping by today. Here is the YouTube video if you are interested in watching,,,


The Stash Bash hop order can be found in the description of this layout on YouTube.
~Marcia

Wednesday, August 17, 2016

Beautiful Flower Girls - Cocoa Vanilla Studios

Hello blogging friends!

I am back today with another layout created with the gorgeous Cocoa Vanilla Studios Love Always collection. The beautiful, soft romantic papers and embellishments are perfect for recording precious wedding memories yet is still versatile enough for everyday photos as well. I really wanted to scrap some wedding photos with it, so I dug out some older pictures of my girls when they were flower girls in my sister's wedding. They were both so excited to get all dressed up and have their hair in an updo. Here is my layout...

  FlowerGirls

The Kerri Bradford Studios heart background cut file reinforces the love theme of the papers and embellishments. Oh boy, does this collection have some stunning embellishments. New are these Bitty Blooms and the Vellum Accents. Don't worry, your old favorites are still around, like these Die Cut Ephemera pieces,Puffy Stickers, and sparkling Enamel Dots.

  FlowerGirls_Detail1

I used the Love Always Alphabet Stickers to construct my title. Some machine stitching across my title helps to set it off. The Chipboard Accent Stickers are a great way to add some dimension as are the Flair Buttons. If you are looking for one-of-a-kind treasures to scrap with, you have got to check out the Love Always Bits and Pieces. I love the multi-faceted heart rhinestones and the puffy sequin heart.

  FlowerGirls_Detail4

Aren't these phrase stickers from the Accessory Sticker sheet fun! I love them!!

FlowerGirls_Detail2

I printed my journaling on vellum and adhered the strips to one of the project life cards. This way the pretty design on the card isn't covered up. With the vellum accents, this is a perfect way to add your memories.

  FlowerGirls_Detail3

Thanks so much for stopping by today. This gorgeous Love Always collection is available for purchase in the Cocoa Vanilla Studios online store. Go ahead...treat yourself. I guarantee you won't regret it. If you are in the USA ... check out the Paper Issues online store.

 ~Marcia

Saturday, May 7, 2016

International Scrapbook Day - Clique Cards

Hello blogging friends.

I know it's International Scrapbook Day, but my Clique Kits Scrap Your Heart out Challenge is for you to create a card. Any Card. If you want to play along, you have a week to post a card in the Clique Kits Facebook Scrap Your Heart Out Event Page.

I used the Clique Spring Card Kit featuring the gorgeous My Mind's Eye On Trend 2 collection to create these. There are a few left in the Clique Store. Use coupon code Marcia10 to save 10% on your order!

This first card is for an upcoming wedding I am attending. This shaker card was created using Top Dog Dies.


My next card I created for a graduation party. A little vellum over busy pattern paper makes the die cuts from the On Trend 2 collection really pop.


My last card could be used for Mother's Day or a Birthday I think...


I don't know if my gold fever will ever go away ... I just love the gold accents...


Thanks for stopping by
~Marcia

Tuesday, March 1, 2016

Chibitronics and Xyron Fun!

Hello blogging friends!

Beth Kingston from Xyron recently asked me to create some cards for HSN using some Chibitronics LED light sets. Since she is airing the show this week, I thought I would share my cards with you here. You create circuits with LED lights attached to stickers, copper tape, and a small battery. Like this ...


I started off simple with a single light on a card. Look at the 'i' in Birthday...


Supplies:
Foam Tape

Then I thought, I got this...lets try two lights (car headlights) ...


Supplies:
Pattern Paper : Basic Grey Dear Heart
Silhouette Cameo 
Just Married Car digital cut file by Alaa' K  Design ID #8579
Foam Tape

Pretty cool, hey! Well I couldn't get the idea to try a ferris wheel out of my head. This cut file is from the Summer Box Cards  SVGcuts collection. If you follow my blog you know I love making box cards. I used colored lights on this one...


Supplies:
Cardstock : American Crafts
Pattern Paper : Simple Stories Let's Party
Brad and Ticket : October Afternoon Midway
Silhouette Cameo

Want to try it too? Tune into HSN to catch the Xyron and Chibitronics airing this week!! Both Xyron and Chibitronics will be available to purchase online.


Saturday, February 6, 2016

Shine Bright - Clique Kits and JustNick

Hello blogging friends!

Have you seen the awesome February Clique Kit  Hot Mess ? It's full of the gorgeous Maggie Holmes Shine collection from Crate Paper. Plus Awesome digital cut files from JustNick! Take a look ...

Here is my first layout with the kit. I created this for the Clique Kits Anything Goes February Challenge. Sorry, still working my way through Naomi's wedding photos. She mixed some black with her outfit; black shoes, black sash, black flowers in her head piece. At first I wasn't so hip on it, but it looked great, and was definitely more her style. The journaling at the bottom reads "Most girls dream of having a big church wedding... not you! Here we are at home getting ready for your big day." I am trying to challenge myself to use more photos on my layouts.... too often I use just a single photo. It helps to print the photos smaller than 4x6. These were printed at 3.5x5.


I absolutely loved that black and white floral print ... so elegant!  I knew it would be perfect for more wedding layouts. It's hard to see in the pictures but I used the JustNick Heart Strings cut file on the lower half of the layout. I love the white on white ... and of course I had to add some machine stitching.


I used the Shine Bright Sticker for my title. Some foam adhesive gives it some dimension.


Ok, this flair pin You Sparkle, is from last January or February's Clique kit. It was perfect for this layout! You can see the JustNick Broken Heart digital cut file here too, cut from black to pop against the white background. You can see the pretty sequin mix here... beautiful golds, teal, and creamy white.


The kit contains a whole pack of the die cut ephemera too! Plenty to create clusters of embellishments.


I hope you will join us this month! It's Anything Goes, so what do you have to lose?
Thanks for stopping by,

Thursday, January 21, 2016

Basic Grey Dear Heart Banner and Xyron

Hello blogging friends!

I am sharing a wedding idea today. When my daughter got married she wanted a vintage suitcase to hold the cards guests brought. I made a banner to hang on the suitcase so people would know the suitcase was for cards. It was perfect for her retro themed wedding.  Well, I've had a request to borrow the suitcase for another wedding ... I decided to make a new banner for the bride so she could keep it. I used the soft and romantic Dear Heart collection from Basic Grey and my Xyron adhesive.


I just tied the ends of the ribbon on the suitcase clips for display. This suitcase was slightly larger than a laptop bag if that gives you an idea for size.


Let me show you how I created the banner.

Supplies:
Silhouette Cameo
Digital file for the banner
Hole Punch

Step 1.  I found a banner in the Silhouette On-line Store and cut out enough for 5 pennants.


Step 2.  I ran the pink pieces and green scallop pieces though my new Xyron 9" Creative Station.


Step 3.  After adhering the pink pennants on top of the scallop base piece, I punched 2 holes at the top.


Step 4.  Weave a long piece of ribbon through each hole, leaving lots of length on both ends for hanging.


Step 5.  Adhere the green scallop border at the top over the ribbon.


Step 6.   Take a piece of white cardstock slightly wider than a small doily die and run it through a Xyron 3" Sticker Maker. I love taking these with me on crops!


Step 7.  Peel off the plastic sheet on top. Place your doily die on top and run through your die cutting machine.


Step 8.  Peel the doily off it's adhesive sheet and adhere to the banner. I love that if I apply the adhesive first and then die cut, I have no adhesive residue to clean up in the doily holes. Now place a letter sticker in the middle. Embellish with other stickers if you like.


Here is what my suitcase looks like closed. It was originally a blue suitcase. I spray painted it black. The inside was also blue and not very pretty looking. I applied some gold contact paper inside to cover up the blue and added a few stick on gems.


Thanks for stopping by today. Be sure to check out the Xyron Facebook page all week to see what our other designers have been making.