This adorably cute Bears Father's Day Box Card is perfect for the outdoorsy Dad. This card was created with a combination of cardstock and solid pattern papers from The Magic of Winter and The Magic of Christmas collections. The print and cut feature in Silhouette was used for the sentiment. You could write your own or substitute a stamped sentiment instead if that is not available to you. I used an embossing folder to give the panel sides a woodgrain texture and added distress ink to bring out the texture even more. You can find the Bears Father's Day Box Card here (SVG, Silhouette).
Go check out all of Lori's Father's Day designs. Right now Lori's designs are 30% off!!!!! Use code Jun2023 to get 30% off all SVGs, Fonts and Commercial Licenses!
I wanted to be sure to share my January layouts with you that I created with the My Creative Scrapbook January Main kit featuring the Simple Stories Feeling Frosty collection. This was such a fun collection and living in Minnesota means I definitely have photos to scrapbook. A kit subscription includes access to cut files as well. This month the cut files are from PearTree Cut Files. I used one on this ski layout of my daughter.
My niece got engaged and they had photos taken last winter outside in the woods. It made for a really cute layout. I love the colorful foam sticker title.
To see more detailed pics please watch my process video.
My next layout documents our Christmas Tree farm outing. For this layout I used the monthly sketch provided by Laura Whitaker.
Here is my take ... Again I used a colorful foam title and added some ephemera die cuts.
My husband walking thru the snow with his tall Wellies on makes me smile .... doesn't he look like he could be in the movie Grumpy Old Men, lol. (The parts of the movie and sequel were filmed not far from my parents home.)
For more detailed pics check out the process video ...
No snow for my last layout but since this photo of my husband with his family was taken in December I figured the snow theme still fit.
If you are interested in a scrapbook kit subscription this one is a good one. They actually have 4 different kits so there is something for all types of scrapbookers.
I can't believe its already November! That means the new PageMaps sketches are live! Becky's sketches are sure to inspire you to get out some paper and glue again. Here is the sketch I used.
Today I am scrapping a photo of my daughter Colette and her dog Sue. They recently moved to Colorado and love it there. One of their favorite things to do is get out and hike on one of many trails in the mountains. Here they are visiting Eldorado Canyon. I love that big smile on that dog's face!
I used the gorgeous new Crate Paper Marigold collection by Maggie Holmes. The little woodland creatures were perfect to add as embellishments. Here are some close-ups. This deer is so adorable. I wish just the deer was sold in packs, I would use them all the time.
Here you can get a glimpse of the mixed media background I created with spray mist as well as more beautiful embellishments.
Fussy cut flowers add a touch of femininity and softens the look.
I have a new YouTube process video available for this layout. I would love it if you would watch.
Thanks so much for stopping by. Below are my affiliate links. I earn a commission from purchases but products do not cost you any more than the normal prices.
I've been struggling in my creative endeavors of late. I feel a bit lost without my Silhouette Cameo. I knew I was a cut file addict, but didn't realize how much of my inspiration came from cut files I wanted to use. Before replacing my machine, Silhouette wanted me to try a new power cord they would ship to me. That took almost 2 weeks. I'm trying to stay positive. I know there is a pandemic going on. I know people are not working, or working reduced hours so thay they can work safely. My machine is now on the way to Utah. The shipping charges were unbelievable. I might save every box I get now, lol. Once they receive my machine, a new one will be shipped to me. I'm hoping my new machine will arrive shortly. In the mean time, here is a layout I created for My Creative Scrapbook using the fun May Main kit. It features the new Picnic In The Park collection by Amy Tangerine and the Simple Stories Hey Crafty Girl collection. I lifted a previous layout, hoping to stimulate my mojo. This design uses lots of stickers and strips of paper. I even broke out my old creative memories circle cutter and proceeded to cut a hole in my new craft mat! (insert facepalm) Yeah me! Another thing that needs to be replaced now. Anyway, here is how my layout turned out...
The rainbow pattern paper had me remembering this photo of my daughter and her best friend wearing a rainbow shirt. It's one of my favorite photos. I love that I was able to captured this fun moment. That woohoo puffy phrase sticker was perfect.
The red circles draw your eye across and down my page. On top of the bottom half circle, I placed the cut apart journal card inside a chipboard frame. Machine stitching adds interest and texture. Lots more puffy stickers and strips of paper are lined up in rows under my photo.
There are a few Simple Stories Spring stickers here are well. (butterflies)
I love how fun this layout turned out. Please check out the My Creative Scrapbook kits. There is sure to be one to suit your scrapbook style. Thanks for stopping by. ~Marcia
I thought I would get a jump start on a Summer mini album now when I have time versus in the summer when (hopefully) things are back to normal. The Pebbles Sun and Fun collection is awesome for recording all kinds of summer activities from pool parties to camping to just enjoying summer foods. I decided on a beach ball shaped mini album. All the pages are circles so even without an electronic cutting machine you could recreate this pretty easily.
I embellished my mini album with the die cut ephemera icons and phrases, cut paper strips, and the cut apart 3" x 4" pocket journal cards.
Here are the inside pages. It was fun coordinating the pattern papers. I used a mixture of 2" x 3" photo mats and 3" x 4" photo mats. This will make it easy using my photo editing software to print multiple photos on 4" x 6" photo paper.
Thanks so much for stopping by today! Are you ready to start some summer fun?
This week on the Pebbles blog it's all about the guys! I picked out some masculine pattern papers from the newest Jen Hadfield collection Hey Hello; blues, greens, blacks, and a bit of yellow. I knew embellishing would be difficult so I decided I needed a strong design. My go to shapes for guys are stars and triangles. It's been a while since I did a triangle layout so I decided to give it a go... lifting a Pinkfresh Studios layout I did a few years ago. Here is what I came up with ...
I even cropped my photo into a triangle! If you look closely, you can see I added a few machine stitched triangles too.
The watercolor background sets off my photo and the pattern papers beautifully. I tried something different for my background. I wanted to try Lindy's Magicals powdered pigment. These were so fun and easy to use. I have lots more experimenting to do, but so far I am loving the results. Check out the YouTube video below for details. I pulled out the Sun & Fun collection embellishments because I wanted to stick to an outdoor theme. I found these awesome trees and a frog which was just perfect!
I used the Lake Thickers that coordinate with the Sun & Fun collection for my title 'Adventure More'. Not wanting to do much more embellishing, I thought I would just stamp a few butterflies from the Sun & Fun collection onto my background. Note to self... stamping before adding the title would have made things easier.
I added a strip of pattern paper at the bottom of my layout, repeating the triangle pattern in this pattern paper. At the top of the layout, I added a few triangles I had leftover and then a few tags from the Chasing Adventure collection.
I love how this turned out! Watch my YouTube process video to see how it came together. (and things to do differently, lol)
Why don't you join us and create a masculine layout too.
Is anyone planning a Spring Break vacation in April? Take a look at my Pebbles Chasing Adventures travel journal. It is perfect to take along on your trip to record your memories and store mementos, maps, postcards, photos and more.
The journal is crafted from a kraft cardstock and then decorated with the fun Chasing Adventures pattern papers. I glued two pieces of kraft cardstock together to make the folio stronger. To give it a vintage feel, I burnished the edges with some distress ink. An elastic band secures the binder shut. Let me show you the inside ...
The front cover has a side pocket to tuck stickers and die cuts that can be used to decorate journal pages while traveling.
There are 3 pages inside. Each side of a page has a gusseted pocket to hold travel momentos, maps, postcards, and more.
Here are the other inside pages...
In the back of the journal I have added a notepad, covered with pretty pattern paper. Here you can journal about your daily adventures and add photos.
If you have an upcoming vacation, you might want to make a travel journal for yourself. Be sure to check out the Chasing Adventures collection to help you document your trip. I love that it has pattern papers and die cuts for whatever kind of adventure you desire from city vacations to mountain hiking to tropical relaxation.
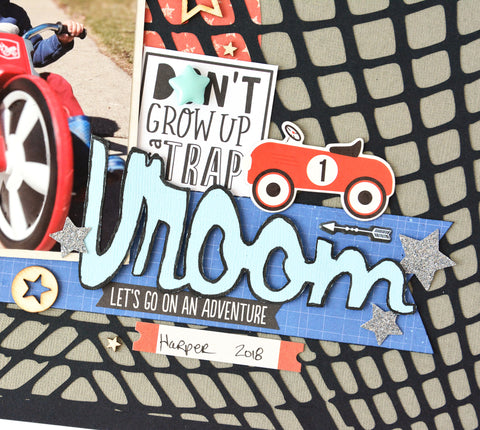
I am hoping it warms up enough here in Minnesota where the kids can be outside again riding their bikes. In the mean time, my Spring fever has me scrapping a photo of my nephew from last Spring. I thought the JustNick StudiosTread Background was perfect for this bike riding photo. I used the Simple Stories Cool Dude collection as well as some Cocoa Vanilla Studios Flying High and Totally Rad.
To get the tire treads to stand out, I backed the black tire tread design with a grey cardstock. I placed a red patterned paper circle between the layers before gluing them together. I didn't want to cover up too much of that tread design. Then my photo and embellishments went over that circle. I may have gotten a little carried away with the embellishing, lol.
I repeated the circle, adding a few more smaller circles in the opposite corner. Again, I went crazy embellishing the tops of these circles.
For my title, I warped the Vroom from the Planes Trains & Autmobiles cut file. I wanted the word to be larger starting out and get smaller. I thought it would help show movement. Here is how you can warp an object in Silhouette Studio.
1. Right click on the cut file and select Ungroup. Move the items you are not using off the grid.
2. Select the object to warp and click on the warp icon (last icon on the right).
3. Select a corner edit point and drag it outward. On the opposite end, select a corner edit point and drag it inward. Play around with the edit points until you like how it looks.
I didn't like how the stars looked warped so I trimmed them off. I replaced them with other stars from an ephemera pack. I edged the word with a black marker. This helps it pop as well as gives it a grungy feel.
I love how this turned out.
Check out the tutorial on how I warped my title in my YouTube process video.