Showing posts with label Basic Grey. Show all posts

Saturday, March 5, 2022

Fish & Chips - PageMaps

 Hey everyone! 

Have you seen the new sketches over at PageMaps for March? They are fabulous for jump starting a layout. Here is the sketch I chose.


I stuck to the sketch pretty close, but I moved my journaling and added a 3rd photo in place of it. I decided to scrap photos from my trip to London with my daughter. After touring London Bridge, we found a pub tucked under the bridge that served the best fish and chips. Of course we had to have a pint of beer to go with it. Such a great experience!


Since fish & chips are often served on newspaper (or paper made to look like newspaper now), I had this idea to use newsprint on my layout. The sad thing is after cleaning out my scrapbook room, I couldn't find any so I decided to make my own. This allowed me to add the location and a date in the newspaper headline.


That great cut file is from PearTree Cut files. I used the Basic Grey Serenade collection that I found in my stash while looking for newsprint. 


I added some England embellishments from Scrappin Happy Studio (phone booth epoxy flair), Jolee dimensional stickers, and some phrase stickers from Simple Stories.


I love how this turned out. Thanks so much for stopping by.
~Marcia


Saturday, October 21, 2017

I Like Fall Most Of All - Stash Bash YouTube Hop

Hello everybody!

I am back to Stash Bashing this month. This time my designer friends and I are focusing on our 6x6 paper pads. Besides making cards, I love using my 6x6 paper pads to back my digital cut files, like these awesome fall cut files from JustNick Studios.


I also used a 6x6 sheet of pattern paper to cut out my title; I Like Fall Most Of All. I thought it would really pop against my mixed media background, but not so much ... so I outlined the title with a brown marker.


These big flowers from the In Bloom cut file reminded my of sunflowers, so I backed them with yellow pattern papers. The leaves I backed with an assortment of green pattern papers from a variety of manufacturers; Fancy Pants Designs, Simple Stories, Basic Grey, Graphic 45, and Carta Bella.


I tried to get my hubby in on this photo, but he just laughed at me. I was laying down in the grass watching the leaves fall. It seemed appropriate that I add a few leaves in here as well.


I wanted to list some of my Fall favorites in the white space of my photo ... of course Pumpkin Spice is at the top!!


This little fox was irresistable! He is a leftover from last year's Simple Stories Fall collection. Those gorgeous epoxy stickers are from the Carta Bella Hello Fall collection.


Here is my process video where you can see how I created that mixed media background and links to the other designer's videos as well ...


Thanks so much for stopping by!
~Marcia

Sunday, May 8, 2016

Be The Change - Clique Kits and JustNick

Hello blogging friends!

I am back today with my 4th layout using the May Clique Kit Northern Lights. Since I am not a PL scrapper, I like to look for new ways to use those PL cards that are in every Clique Kit. This PL card stood out for me; 'Let your smile change the world, but don't let the world change your smile'. I knew I wanted to use it on a layout ... and lucky for me my daughter left this selfie on my phone, lol. Maybe the political campaign is getting to me as this layout reminds me of the Bernie Sanders commercial Together. He really does have the best political commercials out there.

I used a JustNick digital cut file called Bits and Pieces Heart. If you look closely you can see I cut apart another PL card and used it to fill my negative space behind my cut file. Since that Smile PL card contained blues and purples, I then choose blues, purples, white and black pattern papers from the Basic Grey Urban Luxe and Fancy Pants Designs Attwell collections to fill the remaining negative spaces.

  BeTheChangeDetail1

I left the rest of my layout relatively simple. Because I wanted to keep the heart shape prominent, I added embellishments on top of my photo. That Hey Chica die cut also went with my color scheme. I added a few alpha stickers and a puffy heart sticker from the Fancy Pants Attwell collection. I tucked a tag behind my photo for my journaling.

  Chica

I hope I inspired you to give those PL cards another look when using them on your next layout.

Thanks for stopping by.
~Marcia

Friday, April 29, 2016

Honolulu Skyline - Clique Kits

Hello blogging friends!

I am back today with another Honolulu layout using the gorgeous papers from the Basic Grey Urban Luxe collection. This one captures the skyline at night. Our hotel with its partial ocean view was the ideal spot to watch the fireworks. Who knew that every Friday night, there are fireworks over the harbor! What a wonderful surprise!! Here is my layout ...

  HonoluluSkyline_CK 

I love using my Silhouette sketch pens to embellish my background paper. With the skyline photos, I thought it would be really cool to add a sketched skyline to my layout. I used a platinum sketch pen so it would have some shimmer and stand out against the black background. Some splattered white paint and a few stars complete the skyline look. Aren't those emoticon cloud die cuts adorable! They are a Clique exclusive.

Honolulu_Sneak1 

Since the top of my layout was so dark, I wanted the lower half to pop with color. I cut several circles the same size out of a variety of pattern papers. Then I scored a square in the middle of each one. This made it easier to fold the edges of the circles to the inside.

  Honolulu_Tutorial 

 Yes, it is a bit labor intensive, but the result is eye catching.

  Honolulu_Sneak3

Honolulu_Detail1 

With all that color, I didn't go too crazy with other embellishments. I love this flair button from the Fancy Pants Attwell collection and those Richard Garay matte enamel dots.

  Honolulu_Sneak4 

I hope you give this paper folding technique a try. It's lots of fun and is a good way to use up lots of scraps. 

 Thanks for stopping by!

Friday, April 22, 2016

Waikiki Beach - Clique Kits

Hello blogging friends!

I am so excited to be kicking off the May Clique Kit inspiration!! Have you see the kit? It features the Fancy Pants Designs Attwell collection AND the Basic Grey Urban Luxe collection plus lots of Clique exclusives. I LOVE it all!

  9029675_orig

Those Urban Luxe papers were talking to me. I thought they would be perfect for scrapping photos of Honolulu from our recent trip to Hawaii and what could be more urban luxe than Waikiki Beach ...

  WaikikiBeach_CK 

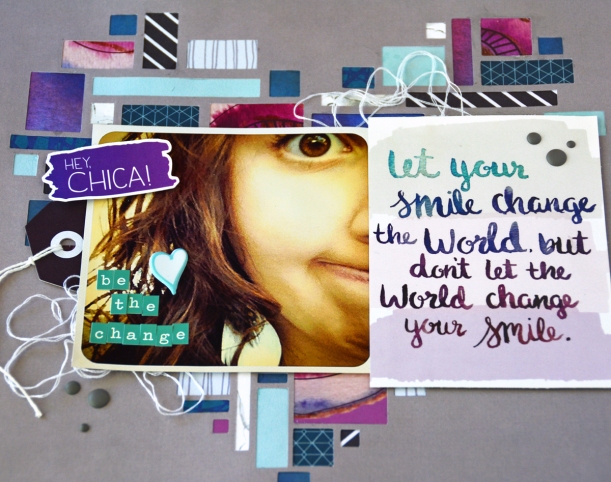
 My favorite pattern paper from the Urban Luxe collection is that floral background paper. I tore the piece of corrugated cardboard so the edges would be distressed. I added a little gesso to soften the edges. Then I placed another piece of pattern paper on top. I clustered two smaller photos in the lower left corner and placed a larger photo in the opposite corner.

  WaikikiBeach_Detail1

This die cut is one of the Clique exclusive cut files this month. I love how intricate it is. The flair in the kit this month is part of the Attwell collection. There is even a fabulous roll of yellow chevron washi tape!

  Waikiki_Sneak3

Here is another flair button from the kit along with these fabulous Richard Garay matte enamel dots. I used a couple of the tags behind my photos to hold my journaling.

  Waikiki_Sneak 

 The heart is one of the Clique exclusive ephemera die cuts. I combined it with more enamel dots and a puffy arrow sticker.

  Waikiki_Sneak2 

 We recently had a user in the Clique Facebook group ask how to import the Clique cut files into the Silhouette software. She had just gotten a Silhouette Cameo!!  I wanted to share with you my method of storing my Clique cut files in my Silhouette library. I like to be able to browse through all my designs. It reminds me of files I might otherwise forget about. I created a folder just for my Clique Kit cut files. To create a new folder, right click on My Library, select New Folder. Give your folder a name (like Clique Kits). Then left click your new Clique Kits folder to select it. The right side should be empty (if you just created the folder).

  Silhouette_CKfolder

To extract your downloaded files. Open up the zipped file and select which ones to extract and click the Extract button. If you do not have the deluxe software version that allows you to cut SVGs, you want to look for the Studio files.

  ExtractFiles

Now open your download directory where your unzipped files are located. Arrange your windows so you can see both your downloaded files (on the left) and your Silhouette Clique Kits folder (on the right). Select one, (or a range of files you want to move) drag the files to the Silhouette Clique folder. I store my printables and cut files together.

  DragToSilhouette 

 It's really that easy!  

 I hope I am getting you all excited to receive your May Clique Kit! Thanks for stopping by.

~Marcia
   

Tuesday, March 1, 2016

Chibitronics and Xyron Fun!

Hello blogging friends!

Beth Kingston from Xyron recently asked me to create some cards for HSN using some Chibitronics LED light sets. Since she is airing the show this week, I thought I would share my cards with you here. You create circuits with LED lights attached to stickers, copper tape, and a small battery. Like this ...


I started off simple with a single light on a card. Look at the 'i' in Birthday...


Supplies:
Foam Tape

Then I thought, I got this...lets try two lights (car headlights) ...


Supplies:
Pattern Paper : Basic Grey Dear Heart
Silhouette Cameo 
Just Married Car digital cut file by Alaa' K  Design ID #8579
Foam Tape

Pretty cool, hey! Well I couldn't get the idea to try a ferris wheel out of my head. This cut file is from the Summer Box Cards  SVGcuts collection. If you follow my blog you know I love making box cards. I used colored lights on this one...


Supplies:
Cardstock : American Crafts
Pattern Paper : Simple Stories Let's Party
Brad and Ticket : October Afternoon Midway
Silhouette Cameo

Want to try it too? Tune into HSN to catch the Xyron and Chibitronics airing this week!! Both Xyron and Chibitronics will be available to purchase online.


Tuesday, January 26, 2016

Family Laminate Photo Frame - Xyron

Hello blogging friends.

I've been doing a little more redecorating in my home. I purchased this photo frame for a bare spot above my stairs. It's one of those where you can hang an assortment of photos on it using clothespins. I cringed at the thought of dusting it though. So I thought laminating the photos would make my life a lot easier and protect the photos from harm as well. I love my Xyron 9" Creative Station for laminating. It is so easy! Besides photos, I decided to hang a pretty card with a Family quote and a heart doily. I used the Basic Grey Dear Heart collection. The soft pinks, grays, and greens are just so beautiful. Here is how my frame turned out...


Let me show you how I did it.

Supplies:
Basic Grey Dear Heart Papers and Stickers
Clothespins
Twine

Step 1.  Choose what photos you want to use and run them through your Xyron 9" Creative Station with Permanent Adhesive loaded then adhere them to different Dear Heart pattern papers. Embellish the photos with stickers.


Step 2.  Run the vellum quote through the Xyron 3" Sticker Maker and adhere to a piece of pattern paper.


Step 3.  Create a card with the Family quote and the Dear Heart pattern papers using the Xyron Mega Runner to adhere the pieces together. Die cut a heart doily from patter paper as well.


Step 4.  Run the mounted photos, and family card and doily through the Xyron 9" Creative Station with the laminating cartridge loaded.


Step 5.  Trim the laminate about 1/4" away from edge of your papers. You want to leave a little edge to seal and protect.


Now you are ready to arrange everything on your frame. I used some small white clothespins to hang my photos.


Next time you have photos to hang, think about laminating them.  Thanks for stopping by today. Have a great week!


Thursday, January 21, 2016

Basic Grey Dear Heart Banner and Xyron

Hello blogging friends!

I am sharing a wedding idea today. When my daughter got married she wanted a vintage suitcase to hold the cards guests brought. I made a banner to hang on the suitcase so people would know the suitcase was for cards. It was perfect for her retro themed wedding.  Well, I've had a request to borrow the suitcase for another wedding ... I decided to make a new banner for the bride so she could keep it. I used the soft and romantic Dear Heart collection from Basic Grey and my Xyron adhesive.


I just tied the ends of the ribbon on the suitcase clips for display. This suitcase was slightly larger than a laptop bag if that gives you an idea for size.


Let me show you how I created the banner.

Supplies:
Silhouette Cameo
Digital file for the banner
Hole Punch

Step 1.  I found a banner in the Silhouette On-line Store and cut out enough for 5 pennants.


Step 2.  I ran the pink pieces and green scallop pieces though my new Xyron 9" Creative Station.


Step 3.  After adhering the pink pennants on top of the scallop base piece, I punched 2 holes at the top.


Step 4.  Weave a long piece of ribbon through each hole, leaving lots of length on both ends for hanging.


Step 5.  Adhere the green scallop border at the top over the ribbon.


Step 6.   Take a piece of white cardstock slightly wider than a small doily die and run it through a Xyron 3" Sticker Maker. I love taking these with me on crops!


Step 7.  Peel off the plastic sheet on top. Place your doily die on top and run through your die cutting machine.


Step 8.  Peel the doily off it's adhesive sheet and adhere to the banner. I love that if I apply the adhesive first and then die cut, I have no adhesive residue to clean up in the doily holes. Now place a letter sticker in the middle. Embellish with other stickers if you like.


Here is what my suitcase looks like closed. It was originally a blue suitcase. I spray painted it black. The inside was also blue and not very pretty looking. I applied some gold contact paper inside to cover up the blue and added a few stick on gems.


Thanks for stopping by today. Be sure to check out the Xyron Facebook page all week to see what our other designers have been making.