Hello blogging friends! I love throwing Halloween parties. It’s fun to decorate the house and invite people over whether its a pumpkin carving party or a Halloween costume party. Of course, part of the fun is creating some party favors to help set the mood. Here is what I came up with using the This is Family collection that Jen Hadfield designed …
Even though this collection is not Halloween based, the colors of the pattern papers have a Fall air about them and I had no problems making them work. The kids will get a kick out of these pumpkin treat bags. I used a svg cut file from SVGcuts called Barn Party. These treat bags could be filled with candy or even popcorn. A clear acetate sheet let’s you see just what treats are inside.
I also spray painted the outside of some pint sized mason jars to look like candy corn. A trick here to prevent overspray is to wrap some scrap paper around the jar and affix with a rubber binder. I spray painted my jars with the opening face down to prevent getting any paint inside the jar.
Once the paint was dry I cut faces from black vinyl to adhere to them.
Box cards make great table decor on your buffet table. This Jack-In-The-Box black cat isn’t too scary. I have a couple of black cats that I took in as strays so it was hard to resist making this one. This svg cut file is also from SVGcuts and is called Halloween Box Cards. It does fold flat in case you wanted to mail it.
I love decorating my house for Halloween... and if you're going to all that trouble you might as well throw a Halloween party, right! Truth is, I just like having a few friends over.
This year I wanted to try printing on burlap to create a unique home decor piece. I found this digital file by Kolette Hall in the Silhouette Store. This was actually much easier than I thought it was going to be. You can be sure that I will be creating one for Thanksgiving and Christmas now too. I decided to decorate my frame with rosettes. These are quick and easy to make with the Imaginisce i-Bond cordless glue gun. I wasn't sure how many rosettes I wanted, or what size either. So I made several different sizes from black and white pattern papers I found in the Happy Traveler collection. I decorated my rosettes with die cut numbers "31" and puffy stickers. Don't worry, those extra rosettes will be used to adorn some cupcakes.
I love my cordless i-Bond Glue Gun. It's low temp, so I don't have to worry so much about burning myself. It dries really fast... which is good when making rosettes, you don't have to hold them in place very long.
Here are a few detail pictures...
These yummy cupcakes are from my local Nadia cupcakes.... she is a cupcake wars winner!
Marcia here today with a fun Cocoa Vanilla StudiosFlying High project to celebrate the end of summer in the Northern hemisphere, just in time for my fellow Minnesotans who are attending the Minnesota State Fair! I used the Summer Carnival SVGcuts digital cut file to cut this Ferris wheel out with my Silhouette Cameo. Let me show you how fun this really is...
I decorated my Ferris wheel with a ton of the stickers from the Flying High collection. Each basket seat has star stickers on both ends. You can see the sticker planes here too.
One side of the Ferris wheel is decorated with rhinestone brads and the other side has these awesome lights by Chibitronics. (I am giving away a set of these lights to one of my blog followers! Just leave me a comment telling me what project you would use them on.) I was a little concerned about getting the lights to work so I only put them on one side. The lights are leds mounted on a sticker pad. You create circuits with copper tape to connect the lights and a battery together. Please view their website for more information.
Here is a little tutorial on the lights....
Step 1. Figure out where your lights are going to be and punch holes.
Step 2. Place your lights into the holes. The sticky side of the light pad will be facing up.
Step 3; Carefully place the top side of the wheel over the bottom side, lining up edges.
Step 4. Now the lights are stuck to the back side of the Ferris wheel.
Step 5. Now you are ready to wire the lights with the copper tape.
The other end of the tape gets connected to a small battery. I created 4 parallel circuits on my Ferris wheel, so I used 4 batteries. Once you have the wheel wired, glue the top piece back on.
Of course I used my new Xyron Creative Station to adhere the pieces together! I love the smooth edge to edge coverage you get.
I am giving away a set of these lights to one of my blog followers! Just leave me a comment telling me what project you would use them on. Winner will be announced here on September 14th. Have a great week!
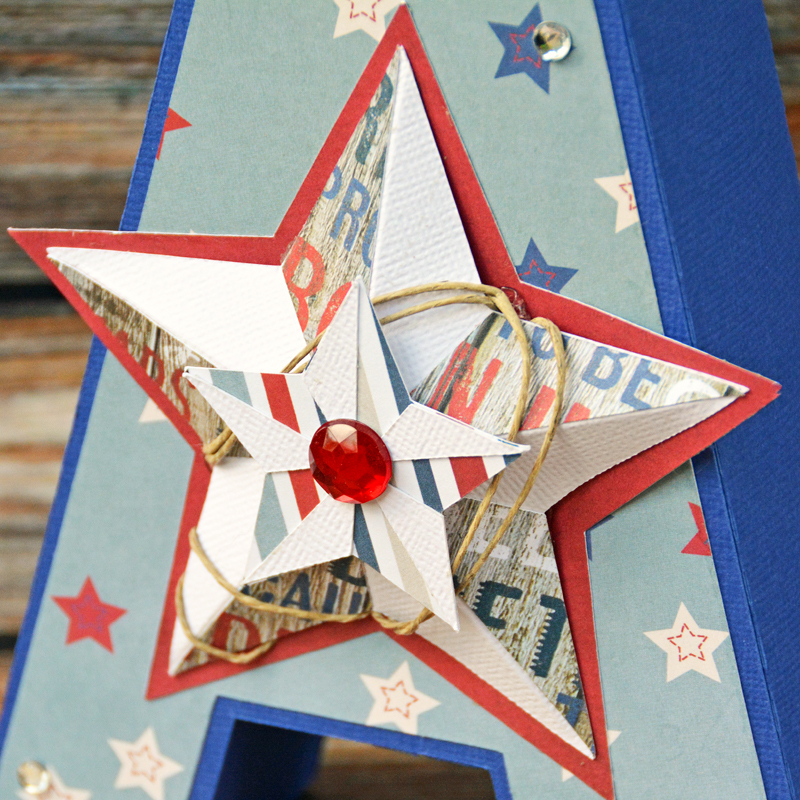
Hello blogging friends! I hope you had a fabulous weekend. My hubby went fishing so I had lots of time to play with my papers :) And, lucky me... Simple Stories sent me the awesome Stars and Stripes Simple Set! Now I am ready to celebrate the 4th of July with this new mantle piece.
Step 1. Use your Silhouette Cameo to cut out the Made in the USA "USA" files.
Step 2. It is so much easier to decorate the alphas before assembling. Use your 9" Creative Station to get a good edge to edge seal when adhering the pattern paper to the cardstock.
Step 3. I also used ribbon to decorate the front of my "U". After cutting the ribbon to size. I ran it through my Xyron 1.5" Sticker Maker and then arranged on the "U". There is no glue seepage through the ribbon this way.
Step 4. Assemble the "U". If you have never used SVGcuts files before, there is an instructional video you can watch in case you get stuck.
Step 5. Using a brad, assemble the flower and use a couple Xyron 3/8" adhesive dots to adhere it to the front.
Step 6. Assemble the "S". With all those curves, this one takes patience.
Step 7. Assemble the rosette. Wait for it to dry. While waiting, wrap some twine around the "S" and tie a double bow. Some well place Xyron 3/8" adhesive dots keeps the twine in place. Use another adhesive dot to adhere the rosette to the "S".
Step 8. Assemble the "A".
Step 9. Score the white star from each point to the middle. Turn over and score again from the corner (between each point) to the middle. Place pattern paper (previously run through the 9" Creative Station) on top. Fold star on score lines. Wrap some twine around the star. Use another Xyron 38" adhesive dot to adhere the smaller star on top. Some Xyron 3/16" adhesive dots worked well to adhere the star to it's red base. Place star on the "A".
Hello blogging friends!
Friday, I didn't think you would get here fast enough! This working girl is looking forward to a weekend, hopefully a weekend where I won't be called into work.
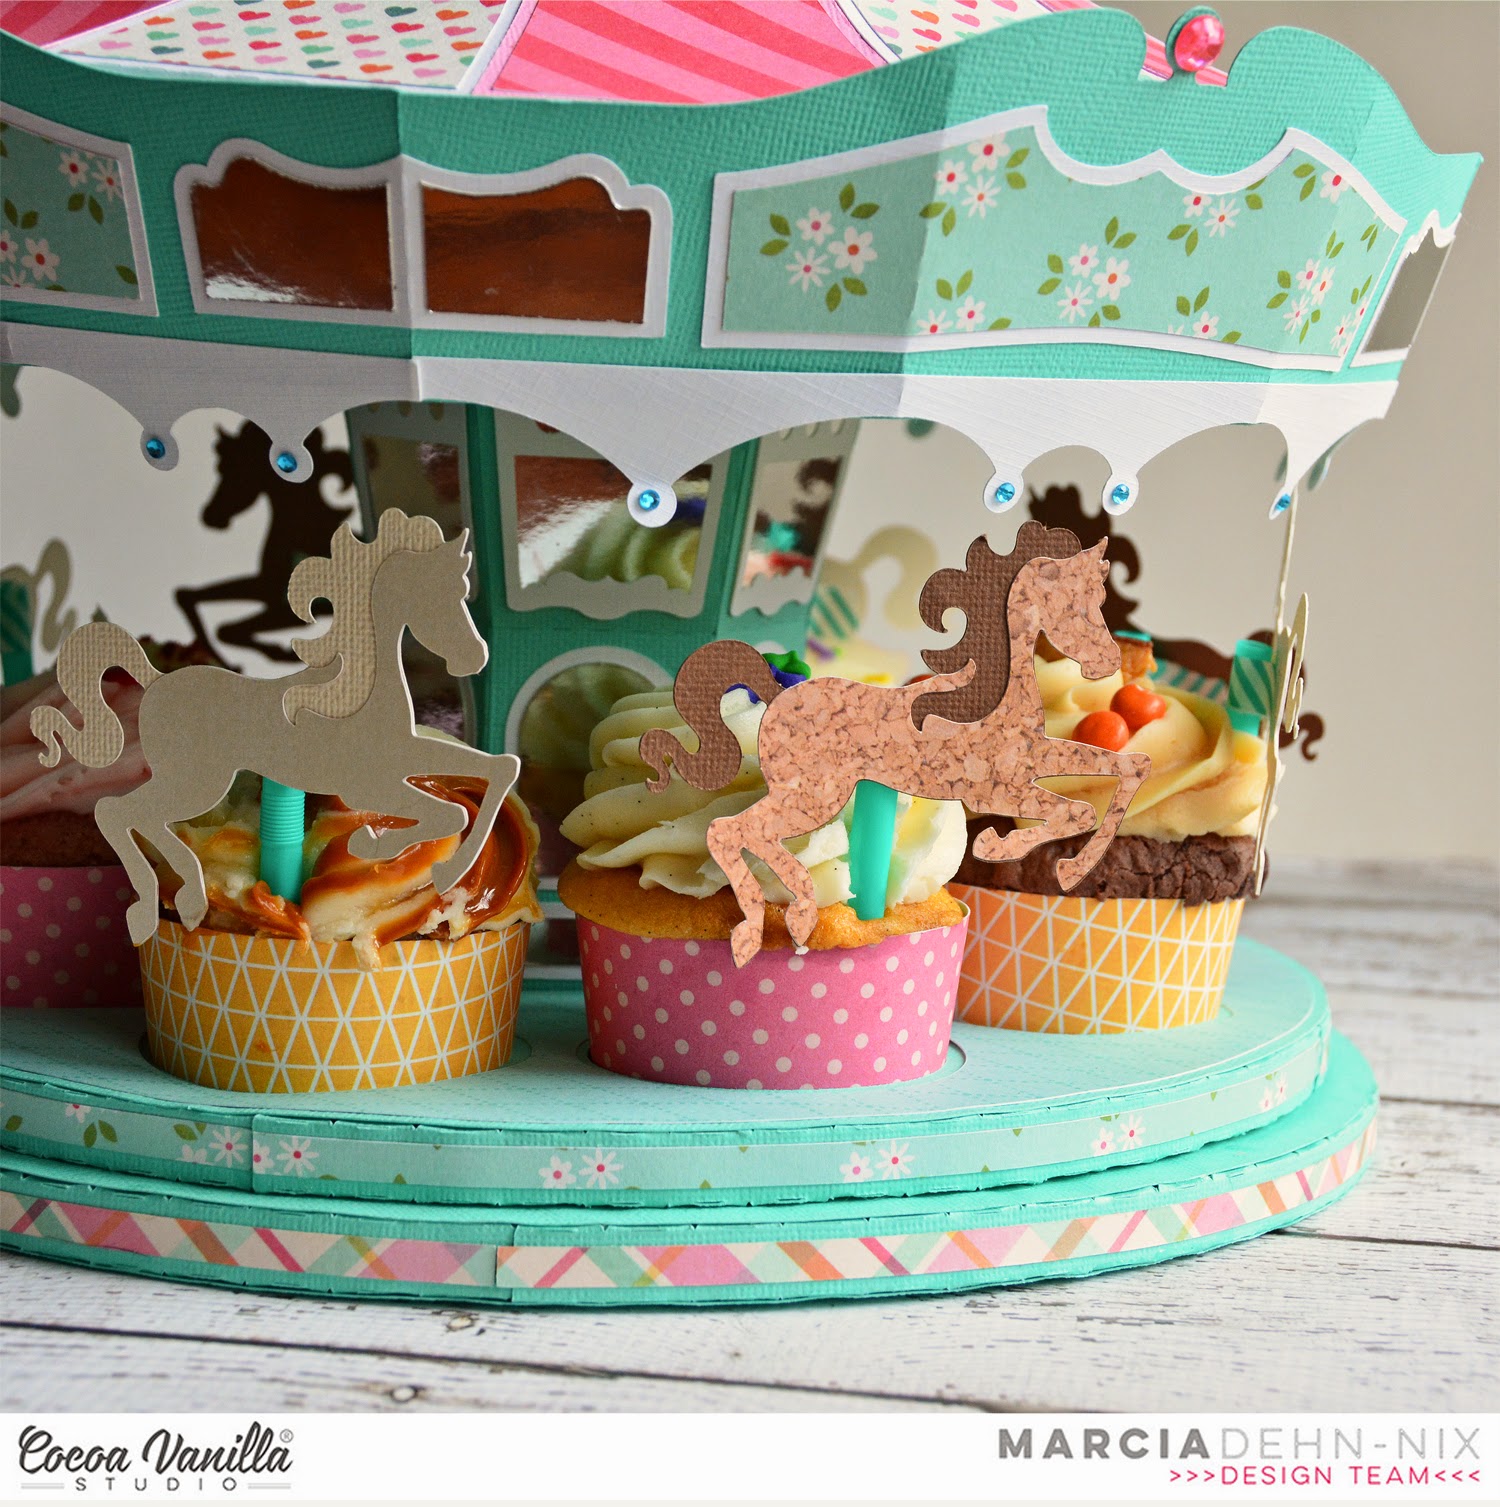
The horses are mounted on straws with washi tape. I have cake pops somewhere in my craft room and couldn't find them. Time to clean my craft room again, lol.
There are even cupcake wrappers to coordinate from the Sugar & Spice collection.
This baby even has mirrors! (ok it's reflective foil paper)
Check out these gorgeous patterns!
One more pic....
I love how this turned out....I am saving it for a baby shower since I don't have little girls anymore. Don't worry, those cupcakes have already been eaten. They are from the famous Nadia Cakes, winner of the Food Network Cupcake Wars!
Maybe I will have to get hubby out this weekend to see if we can find a carousel ride that's open already. Have a great weekend everyone!
~Marcia
Hello blogging friends. I have another Valentine project on the blog today for Top Dog Dies. Here is a treat bag that you could mass produce easily for classroom treats if needed.
I used the Signature Chelsea die to cut out my pattern paper. Then I scored the paper in half so that it could be folded over the top of a treat bag. I filled my bags with Hershey Kisses of course, stapled them shut and used my Xyron adhesive to adhere to the paper over the top of the bags. You can embellish the tops with stickers or more die cuts. I used the
Supplies: Top Dog Chelsea Signature Die Top Dog Heart Mini Album Finishers Die Set cardstock in white, black, pink, and red pattern paper, stickers : Imaginisce Xyron Creative Station, tape runner Scoreboard I just received some new dies from Top Dog and can't wait to play with them. You are going to love them too :) Thanks for stopping by. ~Marcia
Hello blogging friends. It's definitely feeling like Fall here with the cooler temps, trees changing colors, and lots of Football! I made these fun food picks using some fabric tape from Love My Tapes for our Sunday afternoon football party.
I die cut several football shapes and used my brown fabric tape to cover the cardstock. I trimmed away the excess tape along the edges and added some stitching using some DMC floss. I glued another football onto the back side with a toothpick in the middle. I decorated the back side with stickers. Here is how they looked on my table....
These would look awesome in cupcakes too, don't you think?
I was having issues with the storage of my fabric tape so I want to share a tip with you today. Unlike washi tape, fabric tape does not stick to itself on the roll. It was coming all unrolled on me in my storage bin so I use paper clips to keep them rolled up nice and neat. I had these pretty ones in my scrapbook stash, but you could use regular paper clips just as well.
Hello blogging friends. I hope my friends in the States are enjoying the extended weekend. I know I am! I needed the extra time to help my daughter with her wedding plans. We are trying to narrow down a location still, but at least we have found her a dress!!!! I am working on party decor for her bridal shower at the moment. Let me show you the party favors I made with my Silhouette and the ImaginisceBlack Icecollection ....
Here in a picture of the inside, filled with treats.
I love how these turned out! I know, picture overload.... but I wanted to show you the gorgeous pattern paper in this collection. I used my i-Magicut Ribbon cutter on the ribbon handles. I LOVE that tool. and Don't you just love those buttons!! These buttons are shank buttons. I punched a hole in the purse for the shank to go through. To make sure they stayed put, I used some Xyron adhesive dots on the back side of the button. I had one little problem though.... not all the lids wanted to stay closed tucked behind the button. I wanted to be able to open and close the lids, so I did not want to glue them shut. What to do? ... My new little Xyron Mini X 1" Sticker Maker came in real handy for making a velcro closure. Here is how I did it...
1. Cut your velcro strips into tiny rectangles.
2. Peel the velcro apart and run through your Xyron Sticker Maker.
3. Adhere one side to the lid and the other side above the button on the purse.
The theme for the bridal shower is Breakfast at Tiffany's (thus the blue ribbon). I'll have to post other decor pieces after the shower :)