Showing posts with label Halloween. Show all posts

Friday, October 13, 2023

3D Pumpkin Tutorial - Lori Whitlock

 Hello everyone, Marcia here.  Halloween is creeping up and Lori just came out with these spooktacular 3D Pumkins that with a tealight inside make for amazing luminaries. I was obsessed with the lantern luminaries last year and made a bunch to light up my sidewalk for Trick or Treaters. I couldn't wait to add to my collection with the 3D Pumpkin Black Cat (SVGSilhouette). As a crazy cat lady with two black cats, the cat choice was a given. If you are not a fan of cats, check out her other designs in the store.


This looks complicated but I promise you it is easy to make. Let me show you how.

1. Choose your papers and cut out all the pieces. I chose to make an all black pumpkin, but these look great in white or orange as well.


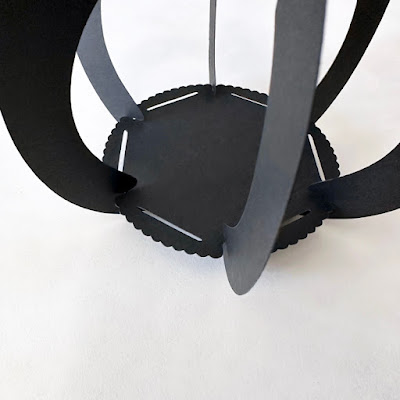
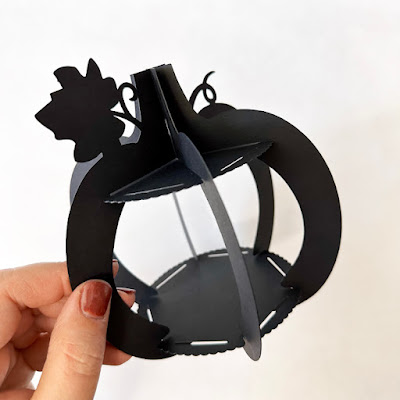
2.  The three pumpkin shaped pieces have notches cut in the stem and at the bottom. Carefully slip one pumpkin inside the other and attach two of the pumpkin pieces together at the stem using the notches and then at the bottom doing the same. Now add the third piece in the same manner. The pumpkins should be able to lie flat after connecting.


3. Spread the pumpkin out. Using one of the round disks, place it inside the pumpkin at the base matching up the notches.


4.  Take the second disk and place it inside the pumpkin at the top, again matching up the notches.


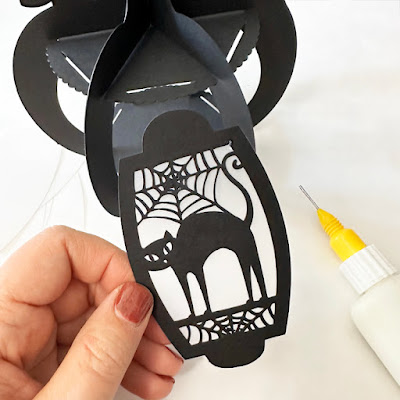
5.  Adhere the vellum pieces to the back of each panel. Go light on the glue to prevent it seeping out where it can be seen.


6.  Curl the panels a bit before inserting the bottom portion of the panel through the slot in the disk at the base of the pumpkin. Then place the top of the panel through the slot at the top.


7.  Repeat for each panel. Add an optional tealight before placing the last panel. I chose to add some raffia grass to the top of my pumpkin.


Be sure to check out all the new 3D Pumpkin designs. They are all spooktacular!

Thanks so much for stopping by! Have a great week,
~Marcia

Tuesday, September 19, 2023

Spider Web Treat Bag - Lori Whitlock

 Hello everyone.

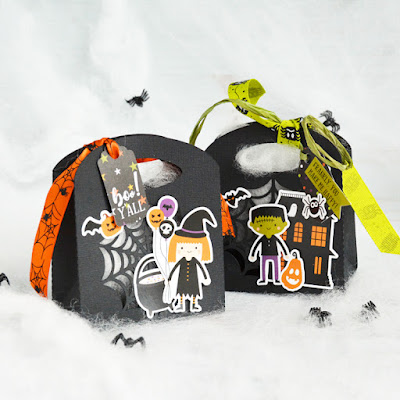
September is just whizzing by and in no time it is going to be Halloween, one of my favorite holidays! I wanted to make some treat bags for the little ones. Lori Whitlock's Spider Web Treat Bag (SVGSilhouette) would allow me to embellish the bags myself using the Echo Park Paper Halloween Magic collection. They  turned out Spooktacular!


I added ribbon and a tag from the die cut ephemera pack so I could tie the bags shut.


Stickers from the sticker sheet worked well to embellish the bag fronts.


I know these bags will put a smile on someone's face! Lori has lots of other fun Halloween bags and treat boxes in her shop. Take a look.

Thanks so much for stopping by today.
~Marcia

Saturday, October 29, 2022

Puppies, I Want Them All - 30 Days of Sketches, Day 28

 Hello everyone,

I recently participated in Series 10 of Christy's Beautiful Life 30 Days of Sketches. I was assigned the sketch for Day 28.


You can find all the sketches in this Facebook Group if you are interested in playing along...30 Days Of Sketches FB Group: https://www.facebook.com/groups/2437398646556752

I flipped the sketch upside-down and decided to use one of the photo spots for my journaling. Since it is so close to Halloween, I scrapped some photos of my daughter Colette from last year. She dressed up as Cruella Deville at the Emergency Vet Clinic she works at and convinced her co-workers to dress up as dalmations. Unfortunately, no dalmations came into the clinic that night to pose for a photo, but a spotted German Shorthair was a close second. Here is my layout using the Carta Bella Hocus Pocus collection by Steven Duncan...


The title is one I created myself using the JustNick Outline Alphas - https://justnick.myshopify.com/products/outline-alpha . I love this SVG cut file for creating my own titles! A layout about Cruella Deville would not be complete without Dalmation puppies! I downloaded these PNG files from https://freesvgplanet.com/  then print and cut them with my Silhouette Cameo.

Check out my YouTube process video for all the details and more close-up pictures...


Supplies:
Hocus Pocus collection by Steven Duncan for Carta Bella Paper -
http://shrsl.com/3q8du
Fineline glue bottles - https://amzn.to/3cGaVbx
Silhouette Cameo 4 - https://amzn.to/3ddGqeU
Neenah Solar White 8.5” x 11” paper pack - http://shrsl.com/2jrt0
Tim Holtz Glass Media Mat ,Black - https://amzn.to/2BamtXJ

Thanks so much for stopping by,
~Marcia

Monday, October 10, 2022

3D Halloween Lanterns - Lori Whitlock Blog Hop + GiveAway

   Hello friends! It's blog hop time at Lori Whitlock!


Here is the blog hop order in case you want to start at the top or get lost along the way...


With Halloween approaching, I thought I would create some lanterns to light up my sidewalk for Trick or Treating kids. I made the 3D Spiderweb Lantern ( 
SVG / Silhouette ) , the 3D Lantern Jack SVG / Silhouette ) , and previously I had created the 3D Witch Lantern (SVG / Silhouette).


These lanterns are designed so a tea-light candle will fit in the bottom. There are lots of other Halloween designs too.

There's a sale happening in the Lori Whitlock SVG Shop!  Use code OCT2022 to get 30% off all SVGs, Fonts and Commercial Licenses!


Also, how about a free file!!  This file is free for today only!  No code or minimum required.


Finally, how would you like to win a $20 coupon to Lori's SVG Shop!


Thanks so much for stopping by! Have a great week,

~Marcia

Monday, September 28, 2020

Witch Hat Handle Box Tutorial - Lori Whitlock

Hello blogging friends! 

Are you one of those people that go all out for Halloween? I love decorating for Halloween! Since it's almost October, I thought I would share a Halloween treat box with you today. This Witch Hat Handle Box can be found here (SVG / Silhouette ). I used the Echo Park I Love Halloween paper collection also designed by Lori for my box.


Let me show you how I put it all together. First select your papers and cut everything out. Before assembling, I like to ink the white edges of my pattern papers with ink. I do this with cardstock too if it has a white core.


When making a box, I prefer to adhere the panels to the box before folding on score lines and gluing the sides shut.


To add glitter to the witch hat star and buckle cut file pieces, run them through a sticker maker face down. You want the glue on the front side. I like to use a bone folder to rub across the back side of the pieces making sure all the glue transfers to the paper.


Sprinkle the glue side with glitter, or press the glue side down into the glitter in a container.


Assemble the witch hat and adhere to the front of the box along with the Eat If You Dare label. Fill with your favorite candy before gluing the handle together. I love adding bling to projects to make them extra special! 

There are four new Halloween themed handle treat boxes in Lori's Shop giving you lots of options. Go check them all out! Thanks so much for stopping by. 
~Marcia  

Saturday, October 12, 2019

Halloween Party with Pebbles!

Hello blogging friends! 

I love throwing Halloween parties. It’s fun to decorate the house and invite people over whether its a pumpkin carving party or a Halloween costume party. Of course, part of the fun is creating some party favors to help set the mood. Here is what I came up with using the This is Family collection that Jen Hadfield designed …


Even though this collection is not Halloween based, the colors of the pattern papers have a Fall air about them and I had no problems making them work. The kids will get a kick out of these pumpkin treat bags. I used a svg cut file from SVGcuts called Barn Party. These treat bags could be filled with candy or even popcorn. A clear acetate sheet let’s you see just what treats are inside.


I also spray painted the outside of some pint sized mason jars to look like candy corn. A trick here to prevent overspray is to wrap some scrap paper around the jar and affix with a rubber binder. I spray painted my jars with the opening face down to prevent getting any paint inside the jar.


Once the paint was dry I cut faces from black vinyl to adhere to them.


Box cards make great table decor on your buffet table. This Jack-In-The-Box black cat isn’t too scary. I have a couple of black cats that I took in as strays so it was hard to resist making this one. This svg cut file is also from SVGcuts and is called Halloween Box Cards. It does fold flat in case you wanted to mail it.


I hope this gives you some ideas if you are planning on throwing a Halloween party. This Is Family papers and embellishments are sold through American Crafts. You can also get the This Is Family collection at JoAnn Fabric Stores!  

SUPPLIES:734162 This is Family Patterned Paper Fresh Picked

734164 This is Family Patterned Paper Bike Ride
734167 This is Family Patterned Paper Picnic
734168 This is Family Patterned Paper We Are Family
734170 This is Family Patterned Paper Fall Time
734175 This is Family Patterned Paper Growing Together
734181 This is Family Patterned Paper Chit Chat
734183 This is Family Patterned Paper Tag You’re It
734196 This is Family 6×8 Paper Pad with Copper Foil Accents
American Crafts Cardstock in black


Thanks so much for stopping by!
~Marcia


Monday, October 7, 2019

Trick Or Treat | PageMaps

Hello blogging friends!

I can't believe its October already! That means there is a new set of PageMaps sketches available! I love working with Becky's sketches, especially when I have been in a scrapbooking funk. You can concentrate on photos and papers instead of design. The October sketches are so inspiring too. Here is the one I used...


I liked that this had three photos. I could do a layout of all three of my kids. These photos are from years ago. My kids are all grown up now and off on their own. I converted my photos to black and white to coordinate better with my Simple Stories Vintage Halloween papers. I really stuck to the sketch on this one too ... when you see a great thing, don't mess with it, lol.


This might look like I did a lot of layering, but really I didn't. The stickers in this collection are already layered. I just added some foam tape behind them for dimension. Then I layered some cute flair from A Flair For Buttons, added a bow and some enamel dots.


I still love sewing on my paper using a machine and distressing the edges of my papers. I used washi tape above and below my photos and some black spray mist behind my title to help it pop more.


A Martha Stewart spider web border punch was a fun touch to add. Some sticker bats and black ink splatters help draw the eyes from bottom left to top right.


I really love how this turned out. Go check out the other sketches. They will make you want to scrap your heart out again. Unfortunately, this collection is not available anymore but you can find others here ... Simple Stories Halloween at Scrapbook.com

~Marcia


Wednesday, November 7, 2018

Spooky Sweet - Simple Stories

Hello blogging friends!

I hope you all had a spooktacular Halloween! Did you get some great photos of your little monsters? The Simple Stories Simple Vintage Halloween collection is perfect for those Halloween photos ... but it can also be used to document your Day of the Dead celebrations too. My little nephew got his face painted for the occasion and I thought I would scrap it with a big sugar skull from the Silhouette store. I backed the sugar skull digital cut file from Paige Evans with lots of different pattern papers from the Vintage Halloween collection.


One of the things I love about this collection is the layering of elements on the stickers and pattern papers. It makes it easy to scrap, but it looks like you spent hours. You can see buttons, doilies, and brads ... but on a sticker or on paper, they add no bulk to your layout.


I used the Spooky Sweet die cut for my title, and layered lots more bits and pieces die cuts, chipboard, and stickers around it. This collection has some awesome washi tape. You can see it near the top and bottom of my layout. I think the one with the pumpkin faces is my favorite.


Here is a closer look at the sugar skull... 


Thanks so much for stopping by today.

Supplies:
10287 Simple Vintage Halloween Collection Kit
10288 Simple Vintage Halloween Combo Sticker
10289 Simple Vintage Halloween October 31st
10290 Simple Vintage Halloween Fright Night
10291 Simple Vintage Halloween Pumpkin Time
10292 Simple Vintage Halloween Jeepers Creepers
10293 Simple Vintage Halloween Beware
10295 Simple Vintage Halloween Trick Or Treat
10296 Simple Vintage Halloween Carve Master
10297 Simple Vintage Halloween 2x2 Elements
10298 Simple Vintage Halloween 3x4 Elements
10300 Simple Vintage Halloween 4x6 Vertical Elements
10301 Simple Vintage Halloween 6x12 Chipboard
10302 Simple Vintage Halloween Bits and Pieces
10303 Simple Vintage Halloween 4x6 Stickers
10304 Simple Vintage Halloween washi tape

~Marcia

Monday, October 22, 2018

Pumpkin Carving - JustNick Studios

Hello blogging friends!

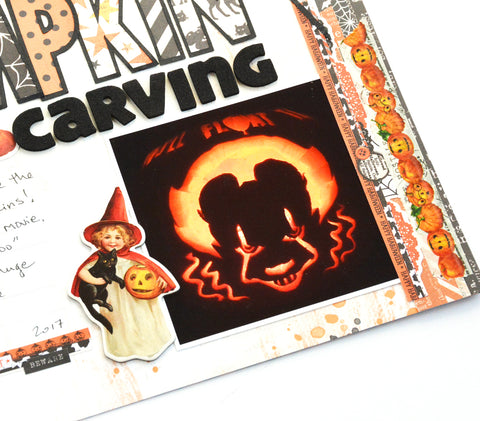
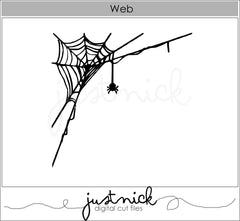
I am back today with some Halloween inspiration for you using some JustNick Studio digital cut files. Do you have your pumpkins ready to carve? My son Trenton takes pumpkin carving very seriously. Last year I helped him create a stencil of the clown from the movie It using my Silhouette Cameo. It's a little hard to tell from the picture, but above the clown are the words You'll Float Too. This pumpkin was so popular last Halloween my Trick or Treaters (and their parents) were taking photos of it. I can't wait to see what he is planning to carve this year. I used the new Web digital cut file to add some creepiness to a corner. I love that big black spider hanging down.


For my title, I used my favorite Outline Alphas and backed the letters with different pattern papers.


Here is a close up of that clown all lit up ...  Be sure to check out the eyes. Awesome, Right?


Here are the digital cut files I used today...


Thanks so much for stopping by. Have a great week!!