Showing posts with label Patriotic. Show all posts

Sunday, June 5, 2022

United We Stand - June PageMaps

 Hey everyone!

Are you ready for more amazing sketches from PageMaps? The June sketches did not disappoint. Here is the sketch I worked with ...


With Memorial Day celebrations and the 4th of July looming, I wanted to do a patriotic layout. I had some awesome photos of when my nephew Max returned from Afghanistan and couldn't wait to scrap them. I stashed bashed big time for this layout. This is an older Pebbles collection called Americana. The Thickers are from the Pebbles America The Beautiful collection.


I love all the layers here. This layout has a photo flip feature I created with my Love My Tapes washi tape. This washi tape has words from the Declaration of Independence so was ideal!


Thanks so much for stopping by,
~Marcia


Monday, June 24, 2019

USS Missouri - Pebbles

Hello blogging friends.

Today I am kicking off patriotic week at Pebbles. I pulled lots of red, white, and blue pattern papers from the Oh Summertime, Chasing Adventures, and Big Top Dreams collections and created a layout about a visit to the USS Missouri battleship in Pearl Harbor Hawaii. Because I had little in the way of patriotic embellishments, I wanted to make the pattern papers work for me by using a digital cut file I designed myself and creating a fun banner with the Jen Hadfield Banner Punch Board.


That dark blue pattern paper makes a bold statement as my background with the die cut stars don't you think. To add dimension, I created a festive banner with my Banner Punch Board. I machine stitched these triangles together. I made it a little easier to work with the banner.


Other embellishments were kept to a minimum. The ship in a bottle from the Chasing Adventures collection was the perfect touch, layered on top of a tag.


I used some older Thickers I had in my stash for my title and added a few journaling strips below my banner.


If you are interested in watching my process while creating this layout, check out my YouTube scrapbook process video.


There is a lot you can do with just your pattern papers and the right tools! Thanks so much for stopping by today.

Supplies:
Chasing Adventures Collection – papers and ephemera
Oh Summertime Collection
Big Top Dreams Collection
Thickers - Memo Newsprint
Banner Punch Board


~Marcia

Tuesday, June 12, 2018

America The Beautiful - Pebbles Guest Designer

Hello blogging friends! 

I am so excited to be guest designing for Pebbles today! Wahooo!   They sent me the Land That I Love collection and I created 2 layouts to share with you. Summer is usually a time that my family vacations. I love a good road trip!  For my first layout God Bless America, I wanted to document a family trip to Mount Rushmore in the Black Hills of South Dakota.


I love that this collection has a Mount Rushmore die cut ephemera piece. It was perfect! I used my Silhouette Cameo to cut a star background from one of the pattern papers.


The rosette star stickers added some dimension to my layout and played up the star theme.


I used the Land That I Love Foil Foam Thickers for my title. These thickers are awesome and are perfect for titles.


I really love how this layout came together.


For my second layout America The Beautiful, I wanted to document a trip to Washington DC. We did a Monument at Night Tour and were able to get photos of lots of the monuments all lit up ... so majestic!


I used a different star digital cut file on this layout, backing it with some stars and stripes pattern papers. I also added some of the fun fireworks rub-ons to the white background.


Once again I used the Land That I Love Foil Foam Thickers for my title and added some flag stickers and die cut ephemera stars.


Do you have any summer trips planned? The Land That I Love collection can be used to document your vacation destinations too.  

I even have a YouTube process video for the God Bless America layout ...


Supplies
Land that I Love Oh! The Places We Go paper (733792)
Land that I Love Fireworks paper (733795)
Land that I Love America paper (733794)
Land that I Love Stars and Stripes Forever paper (733788)


Here are the digital cut files I used today...

 Star Background 5

 Bits and Pieces Star


Thanks Pebbles for having me as a guest designer!


Friday, July 7, 2017

MLK Memorial - Paper Issues

Hello blogging friends.

I am playing along with Paper Issues Free File Friday challenge; use any Star cut file from the Paper Issues store. All the cut files are always FREE! I combined the Count Your Lucky Stars background digital cut file and the Starring You digital cut file and came up with this ...


I combined the red pattern paper from the Simple Stories Say Cheese 3 collection with the Paper Issues June Swag Bag. These Swag Bags are awesome; Full of little bits and pieces of ephemera and pieces of pattern paper! I added some wooden star wood veneers from my stash. Here are some detailed shots...


Here is my process video if you are interested in watching ...


Thanks so much for stopping by. Have a great weekend.
~Marcia

Friday, June 2, 2017

Made In The USA - JustNick Studios and PageMaps

Hello blogging friends.

All this week JustNick designers have been showcasing layouts using PageMaps sketches created by the wonderful Becky Fleck. Here is the sketch she gave me...


It's awesome, right!

There is a lot going on in the sketch, so I decided to use the left side of the sketch for my background cut file. I recently returned from a vacation in South Carolina and had lots of pictures from Patriots Point, so I opted to do a patriotic layout. It seemed fitting with Memorial Day just this past Monday. My guys really enjoyed visiting the USS Yorktown. I think they could have stayed there for hours.  I stuck pretty close to the PageMaps sketch. I did use a larger focal photo in the middle. Here is my layout...


I used a cut file called Ride the Wave. I resized it to fit on the left half of my layout. It reminds me of the American flag waving in the wind. My intent was to leave it red and white, but then decided to add some blue in the negative space. Some machine stitching reinforces the wave design.


Here is the cut file I used today...


If you are interested in my process video, here it is ...


Thanks so much for stopping by. Be sure to check out the other sketches from this past week and their coordinating layouts.

~Marcia

Friday, July 1, 2016

Hero Simple Set - Simple Stories inspiration

Hello blogging friends.

With the 4th of July right around the corner, the focus on the Simple Stories blog this week is on the Hero Simple Set. My first layout features my husband. He is a former Marine and now volunteers his time with fellow police officers from the Minneapolis St Paul Airport Police Department on their Honor Guard. They attend funerals of police officers around the state, but they also volunteer to stand guard over our fallen soldiers coming back from overseas to their final resting place. I used the Bits and Pieces Star Background digital cut file from JustNick Studios.


Instead of backing each of those tiny squares with different pattern papers, I opted to selectively fill portions of the negative space with pattern papers from the Simple Stories Hero Collection Simple Set to mimic our American flag ... with the colors reversed. There are a few embellishments thrown in from other Simple Stories collections as well. Then I added some stars scattered across my layout with modeling paste.


I love the overall look. I didn't want to ruin the star focus, so my journaling was done around the edge of the die cuts.


For my second layout I wanted to show how the Hero Simple Set is not just for your military photos. You can use the pattern papers for vacation photos of patriotic places too. I scrapped a photo from our trip to Pearl Harbor this past winter. To add interest, I added lots of banners with a variety of pattern papers from the Hero Simple Set.


I used the alpha stickers from the collection to create my title which I placed at the bottom of my layout so it wouldn't get lost among the busy banners. More star stickers and enamel dots are scattered across the page very similar to my first layout.


I used my computer to journal directly onto the pattern paper.


Thanks for stopping by today! Look for the Hero Simple Set at your local scrapbook store. I know you will love it.


Monday, May 30, 2016

Honor - JustNick Studios and Simple Stories

Happy Memorial Day blogging friends ... well at least if you are in the USA.

I am posting a patriotic layout using the new JustNick Studios Bits and Pieces Star background cut file. You are getting a sneak peek today ... This file is hitting the JustNick store on Friday ... so please check back then. I was a little too enthusiastic to use it on a Memorial Day layout.

This layout features my husband. He is a former Marine and now volunteers his time with fellow police officers from the Minneapolis St Paul Airport Police Department on their Honor Guard. They attend funerals of police officers around the state, but they also volunteer to stand guard over our fallen soldiers coming back from overseas to their final resting place.


Instead of backing each of those tiny squares with different pattern papers, I opted to selectively fill portions of the negative space to mimic our American flag ... with the colors reversed as that is what I had for patriotic pattern paper. I used the Simple Stories Hero Collection Simple Set with a few embellishments thrown in from other collections. Then I added some stars with modeling paste painted with acrylic paint.


I love the overall look. I didn't want to ruin the star focus, so my journaling was done around the edge of the die cuts.


Here is the cut file I used today. Stop back on June 4th to purchase from the store.


Thanks for stopping by today! Stop by the JustNick store to check out all the awesome digital cut files.

~Marcia

Monday, June 29, 2015

USA - Xyron and Simple Stories

Hello blogging friends! I hope you had a fabulous weekend. My hubby went fishing so I had lots of time to play with my papers :)  And, lucky me... Simple Stories sent me the awesome Stars and Stripes Simple Set!  Now I am ready to celebrate the 4th of July with this new mantle piece.


I used the Simple Stories Stars and Stripes Simple Set, the new Xyron 9" Creative Station, and the Made in the USA cut file from SVGcuts.com. I LOVE how this turned out! It looks great on my mantle, but it could also be used for table decor as well.

Let me show you how I made it. You will need ...

Supplies:
Xyron 9" Creative Station, Xyron 3/8" adhesive dots, Xyron 1.5" Sticker Maker
Simple Stories Stars and Stripes Simple Set pattern paper, Brad
American Crafts cardstock
Made in the USA cut file from SVGcuts.com
Silhouette Cameo or other electronic cutting machine.
Teresa Collins adhesive gems
Twine
Ribbon

Step 1.  Use your Silhouette Cameo to cut out the Made in the USA "USA" files.

Step 2.  It is so much easier to decorate the alphas before assembling. Use your 9" Creative Station to get a good edge to edge seal when adhering the pattern paper to the cardstock.


Step 3.  I also used ribbon to decorate the front of my "U". After cutting the ribbon to size. I ran it through my Xyron 1.5" Sticker Maker and then arranged on the "U". There is no glue seepage through the ribbon this way.


Step 4.  Assemble the "U". If you have never used SVGcuts files before, there is an instructional video you can watch in case you get stuck.


Step 5.  Using a brad, assemble the flower and use a couple Xyron 3/8" adhesive dots to adhere it to the front.


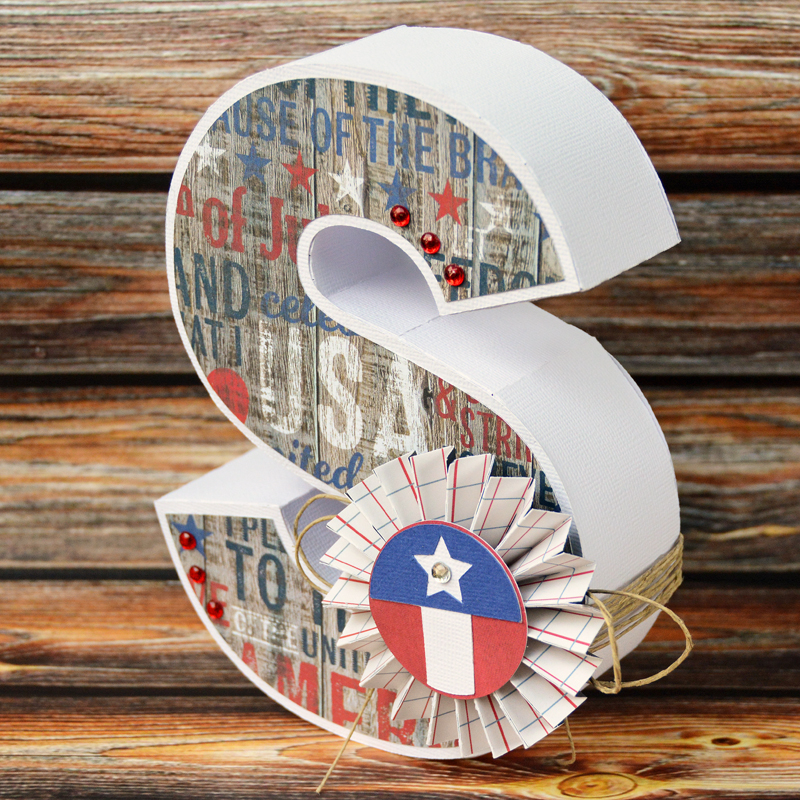
Step 6.  Assemble the "S". With all those curves, this one takes patience.


Step 7.  Assemble the rosette. Wait for it to dry. While waiting, wrap some twine around the "S" and tie a double bow. Some well place Xyron 3/8" adhesive dots keeps the twine in place. Use another adhesive dot to adhere the rosette to the "S".


Step 8.  Assemble the "A".


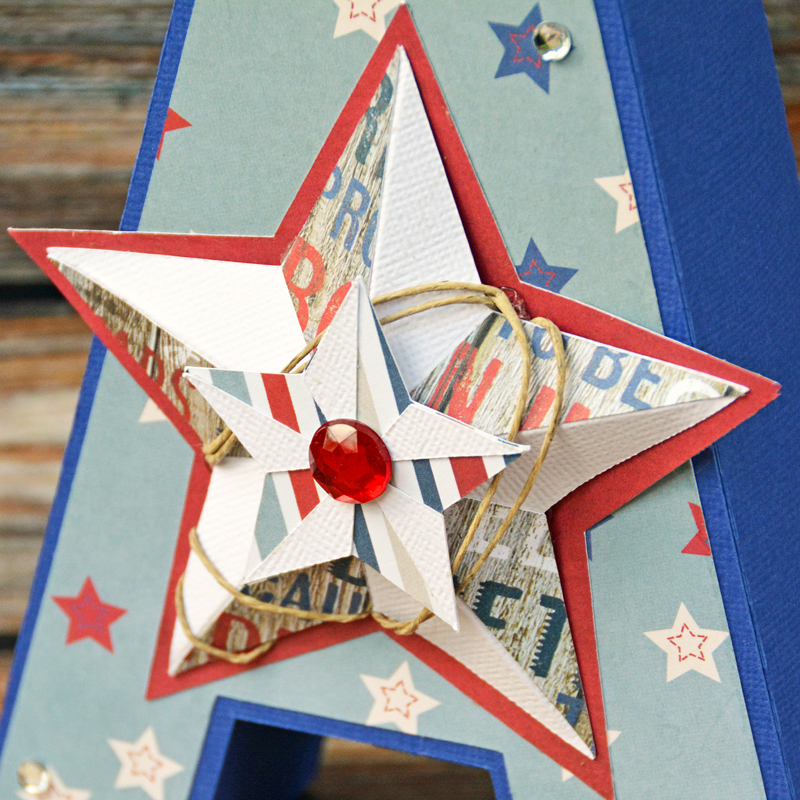
Step 9.  Score the white star from each point to the middle. Turn over and score again from the corner (between each point) to the middle. Place pattern paper (previously run through the 9" Creative Station) on top. Fold star on score lines. Wrap some twine around the star. Use another Xyron 38" adhesive dot to adhere the smaller star on top. Some Xyron 3/16" adhesive dots worked well to adhere the star to it's red base. Place star on the "A". 


Step 10.  Add adhesive gems if you like.

Thanks for stopping by!
~Marcia