Showing posts with label Really Reasonable Ribbon. Show all posts

Saturday, November 7, 2015

Peace - Top Dog Dies Tutorial

Hello blogging friends!

I have a Top Dog Dies card to share with you from the Oct release of Winter dies. This is the Pocket Page Winter Die Set. Isn't it BEAUTIFUL!
Here is the card I created ...


I wanted to create a little snow scene for the deer so I layered a piece of vellum over the white cardstock with some die cuts underneath the vellum and some on top. 


Here is how you can achieve this look too...

Supplies You will Need:
Top Dog Dies Pocket Page Winter Die Set
Top Dog Dies Borders 2 Die Set
Pattern Paper: Little Yellow Bicycle (Winter Twig)
Stamp (Sentiment): Hero Arts (Merry Christmas Trees)
Cardstock
Ribbon: Really Reasonable Ribbon
vellum
white paint
Ranger Brown Distress Marker
StazOn ink

Step 1.  Die cut your trees, snowflakes, deer, bird, and mat from cardstock.
Then die cut the mat from vellum too and stamp a sentiment in the upper left. I like to use StazOn ink when stamping on vellum.


Step 2. Adhere the trees off to one side of the cardstock mat. Add the bird so he is sitting in the trees.


Step 3,  Adhere the vellum on top. When adhering your vellum, you want to make sure you have even coverage over the entire die cut. I love to use my Xyron adhesives (Sticker Machine or Creative Station) for my vellum.


Step 4. Splatter some white paint on top. Let this dry. Paint will not warp the vellum like something more water based; like mists or watercolors.


Step 5. Use a Distress marker to ink the antlers and edges of the deer and adhere deer on top of the vellum.


You can use your snow scene on a card like I did, or if you are a pocket scrapbooker, it would look awesome in a pocket too.

Here is one more pic of the completed card...


Thanks for stopping by
~Marcia

Tuesday, September 29, 2015

Welcome Baby - Xyron and Paper Smooches

Hello blogging friends!

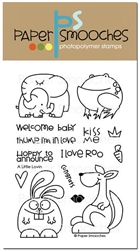
Today I have a Welcome Baby gift bag ensemble to share that I created with the Paper Smooches A Little Lovin stamp set and my new Xyron 9" Creative Station. This stamp set is so adorable, take a look...


Besides baby announcements and gift cards, this set would be perfect for some Valentines and more. I couldn't pass up a chance to practice my coloring skills on the elephants. I am by no means an expert. I think I need lots more practice, lol. I even used the Welcome Baby sentiment to decorate my gift bag.


I upcycled this brown bag, giving it new life as a gift bag. I love being able to reuse things some people would normally just throw away. Here is a tutorial if you want to see how I created my gift ensemble.

Supplies:
Small Brown Bag
Cardstock: American Crafts
Paper Smooches A Little Lovin stamp set
Ranger Distress Ink, Inkadinkado black dye ink
Ribbon
Xyron adhesive dots

Step 1. Cut a piece of pattern paper slightly smaller than the front of the bag and stamp Welcome Baby using the Vintage Photo Distress Ink.


Step 2. Cut a square of pattern paper for the front of the bag (5"x5") and a piece of cardstock slightly larger. Also trim a piece of white cardstock for die cutting the doily.


Step 3. Run the larger piece of pattern paper through the new Xyron Creative Station with the 9" permanent adhesive loaded. Adhere this to the bag front.


Step 4. Switch to the 5" permanent adhesive an run the smaller pieces through, including the white cardstock for the doily. YES, the same machine can be used with both the 9" and the 5" adhesives! How cool is that!


Step 5. Die cut 2 doilies from the white cardstock with the adhesive already applied. Be sure to remove the plastic from the top first. We will use the second doily on the card.


Step 6. Assemble these piece on the front of the bag.


Step 7. Using a black dye ink, stamp the elephant images onto Copic coloring paper. We will need one for the bag and one for the card.


Step 8. Color your images and fussy cut them out. We will use the second elephant on the card.


Step 9. Using the Xyron adhesive dots, adhere the elephants to the bag front.


Step 10. Tie a bow. I like using this Bow-easy tool. Ties a perfect bow every time!


Step 11. Trim up the Ribbon edges. I am using my Imaginisce i-Magicut Ribbon cutter. It cuts and seals the edges at the same time.


Step 12. Ta Da! A beautiful bow!

Step 13. Adhere the bow to the bag with a Xyron adhesive dot.


Step 14. Trim a piece of cardstock and pattern paper for the card. My card base is 4.25"x8.5". Score it at 4.25".


Step 15. Run the card front through the Xyron Creative Station with the 5" permanent adhesive loaded. Adhere to card front.


Step 16. Adhere doily (previously cut) and elephants.


Step 17. Tie a ribbon and adhere using the Xyron adhesive dots.


Thanks for stopping by. Have a great week!


Friday, June 19, 2015

Petting Zoo Mini Album - Imaginisce

Hello blogging friends!

With school out for the summer I bet a lot of you have road trips planned! I thought it would be fun to put some of my favorite photos together in a mini album. The Heartland Farm collection is perfect for these photos of my kids at a petting zoo. It's always the little goats my kids are drawn too. They just love to feed those baby goats! I started out by covering some boxboard with different pattern papers, adding my photos and some die-cuts and stickers to embellish. 


I just love the expression on my son's face in this photo.


This mini album has a couple ring binders keeping the pages together. My i-Magicut Ribbon cutter came in handy for cutting an assortment of ribbons for me to tie around the rings. The i-Magicut Ribbon cutter cuts and seals the edge at the same time and it is so easy to use. Open up the i-Magicut and set your ribbon across the platform. After closing the i-Magicut, you just need to press and hold this button for 5-10 seconds (depending on the thickness of your ribbon).


Supplies:
Imaginisce : Pattern Papers, Die Cuts, Stickers, Enamel Dots (Heartland Farm), I-Magicut
American Crafts: Cardstock, Red Homestead Alphabet Thickers
 
 Thanks for stopping by,

Friday, May 15, 2015

Time to Shake Blog Hop - Top Dog Dies

Shake, Shake, Shake That Card! It’s blog hop time again at Top Dog Dies. We have a whole lotta shaking going on this time for our blog hop. Shaker Cards! They are always a fun card to receive and make.


To add extra fun to our blog hop…we are offering up a prize! Three winners will receive the New Top Dog Dies Hot Air Balloon Die Set. 


For your chance to win, enter your email address below by 5/20/15. Winners will be posted on the Top Dog Dies blog after 5/20/15.
Here’s how it works…
Visit each blog on the hop in order. Each Design Team member has created a special shaker card using dies from Top Dog Dies. Visit each blog, check out the shaker projects and leave your comments. Don’t forget to enter to win. Here is the line-up....


I created my card with the Top Dog Dies Heart Doily die set and the Top Dog Dies Sheep die set. I had the perfect punny stamp for the sheep, an older Pink Stamper stamp set. Here is my card...


Supplies:
Top Dog Dies Heart Doily die set
Top Dog Dies Sheep die set
Top Dog Dies Heart Mini Album Finishers die set
My Mind's Eye Pattern paper
Really Reasonable Ribbon
Pink Stamper Punny Stamp set
Clique Kits Sequins from their Spring Card kit

Enter to win here....
Fill out my onlineform.

Now hop on over to Kymona's blog.
~Marcia

Wednesday, May 13, 2015

A Little Birdie Told Me - Top Dog Dies Inspiration

Hello blogging friends. I have another Top Dog Dies card to share with you today. I found these pretty Bo Bunny papers when I was sorting through my papers and thought they were perfect for a Spring Birthday card. I can't seem to get enough flowers while I am waiting for something to start blooming here.


I layered up the Top Dog Bella Doily die and the Top Dog Vintage A2 Mat die at the top of my card. Don't be afraid to cut your dies and use only a portion, The Top Dog Dies Little Birds and the Close to My Heart sentiment stamp "a little birdie told me .." are a match made in heaven.


Supplies:
Top Dog Dies Bella Doily
Top Dog Dies Vintage A2 Mat die
Top Dog Dies Little Birds die set

Thanks for stopping by!
~Marcia

Saturday, April 18, 2015

Welcome Spring - Imaginisce

Hello friends! I am cleaning up my flower beds today so I am only popping in quick with a card I created for Imaginisce with the Welcome Spring collection.....


Unfortunately, no real tulips in my neck of the woods yet, but these tulips are sure to put a smile on anyone. I think I will set this one aside for Mother's Day. I love shaped cards, don't you? 


One of my favorite Imaginisce tools is the i-Magicut Ribbon Cutter. It cuts and seals the edge of the ribbon so it won't fray. Pop on over to the Imaginisce blog to see a tutorial I prepared on how easy it is to use.


Supplies:
Imaginisce : Pattern Papers (Welcome Spring, Little Princess), I-Magicut Ribbon Cutter
American Crafts: Cardstock

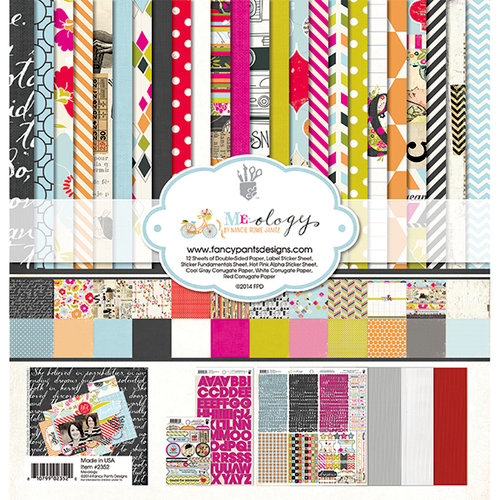
Don't forget about the Clique Kits April challenge sponsored by Fancy Pants Designs. Take a look at the prize.... The Meology collection!!!

SBC_fp-2352_0
Here are a few details to go along with this months challenge!
  • You may combine our challenge with other challenges
  • You may enter our challenge up to 3 times
  • Link up your projects by April 30, 11:55 pm CST
  • You are not required to use a Clique Kit to link up
  • You are not required to use Fancy Pants Designs products to link up but doing so does give you an extra entry
  • Create any type of project
  • Link directly to your challenge project entry post
Have a great weekend!
~Marcia

Wednesday, February 25, 2015

First Communion Card - Top Dog Dies

Hello blogging friends. Did you hop yesterday to see all the awesome projects created with the new Top Dog Dies? No? Scroll down to see my post from yesterday. Top Dog Dies is giving one lucky person a complete set of these Spring dies! You have until March 6th to enter. The very lucky winner will be announced on March 7th.

I think this new Cross die is a favorite among the designers. It is so intricate and pretty. I created this First Communion card with it.


I used some gold foil paper for the cross. Against a white background it is just stunning.


The Top Dog Dies Scallop Frame and Mat set is not new, but I thought it would really frame that gorgeous cross nicely.

Supplies:
Top Dog Dies Scallop Frame and Mat set
Top Dog Dies Cross Die set (new)

If you haven't seen the other new dies, check out the Top Dog Dies store here.
Thanks for stopping by!
~Marcia