Showing posts with label Gift Card Holder. Show all posts

Thursday, November 23, 2023

Santa Gift Card Tag Tutorial - Lori Whitlock

 Hello friends.  Christmas is creeping up. I am a big fan of giving gift cards so my recipients can pick out their own gift but I like to make gift card holders to put them in. I selected the Gift Card Tag Santa (SVGSilhouette) to make for my gift cards this year.  There is a pocket on the back side of this tag that holds the gift card. I used Lori's Have a Holly Jolly Christmas collection to create my tags.


These are really easy to assemble. Let me show you how.

1. Cut out the pieces from desired pattern paper or cardstock.


2. Fold the tag along the score lines folding the flaps up. Apply glue to the flaps and adhere to the back of the tag to form the pocket.
 

3. Adhere the white beard and Santa suit trim to the top of the tag.


4. Slip the black belt through the belt buckle and adhere to the bottom of the tag. Add the two black buttons above the belt on the white trim.
 

5. Add ribbon or other embellishments as you wish.


Check out Lori's other gift card holder designs in the store and make some of your own. Thanks so much for stopping by.
~Marcia

Thursday, November 3, 2022

Holiday Gift Card Holder Tutorial - Lori Whitlock

Hello everyone! 

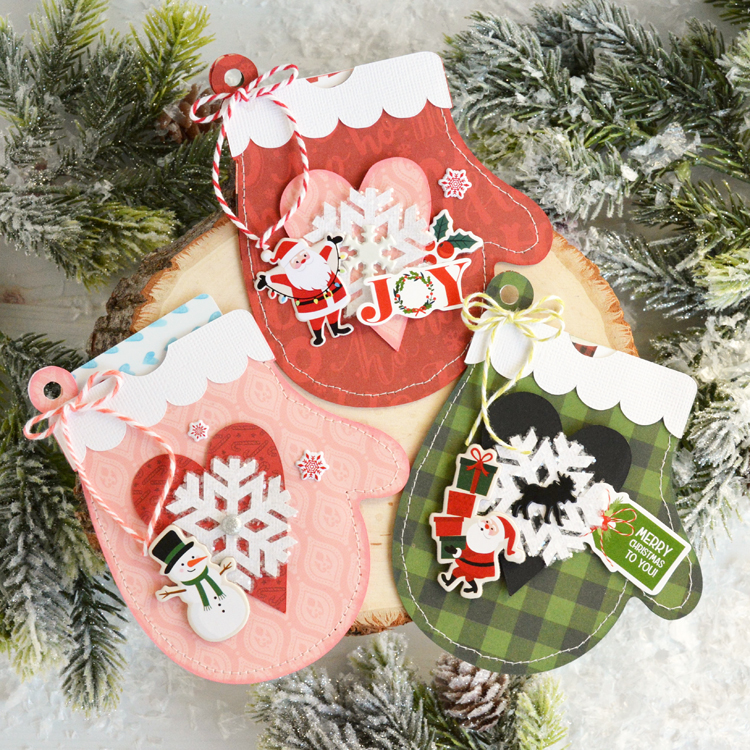
I have a holiday gift card tutorial to share with you today. I love to give gift cards to friends and family so they can buy whatever they want. When gifted in such a pretty package, handmade by you, it's not the easy last minute gift so many people say they are. This Mitten Gift Card Holder (SVG, Silhouette) cut file can be found in Lori Whitlock's Store along with many other varieties of gift card holders. I used the new The Magic Of Christmas collection and also a pink pattern paper from the Our Little Princess collection. 

Want to find out how to make them yourself?

1. Choose your papers and cut out all the pieces. I then like to ink the edges of the pattern papers to give the shapes dimension.


2. I wanted to add some sparkle to my snowflakes so I ran them through my sticker maker machine upside-down. This puts the adhesive on the top of the cut file. Then place it adhesive down on top of some glitter.


3. You could glue the sides and bottom of the mitten shut, but I prefer the look of machine stitching. Unlike adhesives that might give way over time, I know the mitten won't fall apart when stitched.


4. Next, glue the white mitten edge to the upper front and back pieces of the mitten. Use a brad to attach the snowflake to the heart then adhere to the front of the mitten with foam tape.


5. Decorate as you wish. I loved using the puffy stickers and brads from the Magic of Christmas collection. They were just the right size!


6. Then repeat! They are so fun to make you won't be able to stop. This green plaid mitten with a black heart is perfect for the guys on your list.


Thanks so much for stopping by. Be sure to check out Lori's Store for more holiday ideas.
~Marcia


Wednesday, November 25, 2015

It's The Most Wonderful Time Of The Year - Top Dog Dies

Hello blogging friends.

I gift lots of gift cards for the Holidays as my nieces and nephews are older and have rather particular preferences. I like to present them in a pretty setting though. Much more festive than those ordinary gift card envelopes. I used my new Top Dog Dies Snowman die set to make this one.


The bottom half of this card opens. I can secure the gift card to the front and still write a sentiment inside. Some gift cards are just too pretty to cover up. The top of the card was easily decorated with a tag from Chic Tags and my snowman. A few scattered snowflakes completes the card.


Thanks for stopping by. Top Dog Dies is having a Black Friday Sale. It's going on now. Be sure to check it out.


~Marcia

Wednesday, November 26, 2014

A Trio of Gift Card Holders - Xyron Tutorial

Hello blogging friends. I have some adorable gift cards to share with you that I created with the Doodlebug Frosty Friends collection, my Silhouette, and of course Xyron adhesives.


Let me show you how I created them...

These Silhouette cut files are by Jamie Cripps and are available in the Silhouette store. Only the bottom half of the card opens, to reveal a gift card.


When I am cutting lots of die cuts, I have a tendency to lose the little pieces (like the dots for an i). I like to keep my 2.5" Xyron Sticker Maker close by so as soon as I take a die cut off the cutting mat, I place it into my sticker maker.


Sometimes there is a little glue residue remaining on my die cut.


Xyron has a handy tool to help remove that. It's a little square of rubber that grabs hold of the adhesive.


On a couple of my cards, I wanted to created a shaker using some vellum and a few sequins.


I kept my sequins to the outside as the die cut would just cover any in the middle. I carefully stitched around the edge. Then pieced my cards together. A little bakers twine and a paper clip to keep the card closed finish them off.


These would make great teacher gifts, but I plan on gifting these to my teenage nieces and nephews.

Supplies:
Xyron Tape Runner
Xyron 2.5" Create-a-Sticker machine

Adhesive Eraser
Doodlebug Frosty Friends pattern paper, clips
bakers twine
Silhouette Cameo
Jamie Cripps cutting files
Sequins
vellum
Brother sewing machine

There is lots of time to create a few of these festive gift card holders for yourself!
~Marcia

Wednesday, July 16, 2014

Princess Party Gift Holders - Imaginisce inspiration

Hello blogging friends. I hope you are enjoying your summer. We have had the strangest weather here in Minnesota. We broke records in June for the most rainfall and experienced flooding in places. Now in the middle of July when the temps should be in the 90's, we have temps in the 50's and 60's. There is a positive side... my garden is flourishing and I don't have to water :)  These blueberries are starting to ripen now. I am so excited!

 
Ok, now onto the Imaginisce paper inspiration... My niece has a birthday coming up so I wanted to create a birthday card for her with the Little Princess collection. Ok, she will be 17! But I still remember her loving to dress up in a Cinderellla costume when she was about 3 years old so the Little Princess collection reminds me of her. I went browsing in the Silhouette store for inspiration and found this cute folder. It's perfect for slipping in some cash or a pair of movie tickets. The folder would be great for party invites too. You could slip a card with the invite details inside. While browsing the Silhouette store I discovered something else too, there are LOTS of print and cut files for the Imaginisce Enchanted collection. They are perfect with the Little Princess collection! I printed and cut out the carriage, then downsized the frog and crown before printing so that I could use them with my i-Top. I love my i-Top and my Silhouette for creating my own flair to coordinate with my projects. 


Here are those gift holders....


I had to decorate the back too with these Princess die cuts....


I was having so much fun, I made another folder...


Isn't this collection adorable! Don't forget to use the i-Magicut ribbon cutter for no frayed edges on your ribbon.
 

Supplies:
Imaginisce : Pattern Papers, Cardstock Die Cuts  (Little Princess), Foam Tape, i-Magicut Ribbon Cutter, i-Top, small, large, and extra large brad daddies 
Silhouette Store: Carriage, Fairytale Creatures (Imaginisce Enchanted collection)
American Crafts: Cardstock, Adhesive
Silhouette file by Jamie Cripps

Enjoy your week!

Wednesday, May 21, 2014

Thank You - Imaginisce Memorial Day Gifts

Hello blogging friends! I can't believe its almost Memorial Day already. My crab trees and lilacs are just starting to bloom. They are gorgeous. Minnesota has been slow to warm up this year. There were frost warnings last weekend. That is turning around though...the temps may reach 80 degrees today! Wahoo! 

I am up on the Imaginisce blog today with a Memorial Day gift idea. I created my Memorial Day project with a specific person in mind, my husband. He served in the United States Marine Corp many years ago. Now he is part of an honor guard detail for fallen soldiers making that last trip home to their families. Fallen soldiers are escorted 24/7 on their journey. Its ceremonial, but it speaks volumes. It says We care. We respect the ultimate sacrifice that you made. I wanted to make something to thank my husband for the service he continues to provide for this country that we love so much.


This is a two part gift. The first one is a gable gift box made from kraft paper and embellished to look like a flag on the front. It's perfect for tucking in a note along with a gift card to my guys favorite restaurant.


My husband loves to do crossword puzzles. Every crossword puzzle maniac knows you need to use pencils, in case you need to erase a word that was wrong. One pencil would do, but my guy won't sit with his crossword unless he has 2 pencils sharpened and ready to go. I think this pencil holder was made with him in mind, 4 pencils at the ready! I kept the flag theme going on my pencil holder too.


Supplies:
Imaginisce : Pattern Papers (Perfect Vacation), Foam Tape
American Crafts: Cardstock, glitter tape
Core'dinations Kraft Paper
pencils,
Silhouette Cameo
My Favorite Things Fishtail Flags die
Hero Arts Sentiment stamp set

If you would like to help our Military personnel, check out Operation Write Home. You can donate handmade cards for soldiers to use to send to their loved ones.

No big Memorial Day plans for me. My guys here are recovering from surgery. My husband had steroid injections into his bad discs in his back, and my future son-in-law just had an emergency appendectomy. Looking forward to a quiet and relaxing weekend at home.

Have a fun and safe Memorial weekend!

Wednesday, October 17, 2012

So Thankful - Quick Quotes Club Q

Hello Quick Quotes friends!  I hope you are enjoying the fall weather wherever you are and taking lots of photos. And do you know, the October Club Q kit is the perfect thing to scrapbook those photos! I was fortunate enough to get to work with the October Club Q kit this month and all I can say is Oh my! It is a fabulous kit. Take a look at this layout of my family that I created with it.
I added a strip of burlap to give it a more rustic look as well as some colorful die cut leaves. I just love the intricate cut on this overlay piece and that So Thankful die cut that I used for my title. Here is a close-up.
There is a lot more goodies in the Club Q kit, so I just had to make this gift card holder too.
It opens up to hold 3 different gift cards, or you could tuck little notes or pictures inside the pockets.
I added this little stamped owl on the inside with the sentiment "Whooooo loves you?" This was super easy to put together. It came precut. I just had to score a few lines and fold. Then add your own personal touch.

Quick Quotes Supplies:
October Club Q featuring the Stowaway papers
Powderpuff Chalk ink in Midnight Confession and Amaretto

Other Supplies
Core'dinations cardstock in red, yellow and orange
burlap
hemp cord

There is a lot more in the October Club Q kit! Even a gorgeous mini album that I will definitely be posting at a later date.

Enjoy the rest of your week
~Marcia