Showing posts with label Banner. Show all posts

Tuesday, November 12, 2019

Christmas Star Garland - Pebbles

Hello blogging friends!

Do you like to make some of your own Christmas decorations? I love adding homemade touches around my house... like this star garland I created with the Pebbles Merry Little Christmas 6x6 paper pad. These origami stars can be made into ornaments for the Christmas tree or added to a swag to decorate your fireplace mantle.


To make my star garland I selected a variety of 6x6 pattern papers from the Merry Little Christmas 6x6 paper pad.


The first step to making these stars is to fold and cut the 6x6 papers into pentagon shapes. There is a fabulous tutorial I highly recommend on how to fold the stars here.


Once I had all my stars folded, I tied them to my swag garland with some gold thread.


This is even a craft you could do with older children. Here are some closer views of the stars...


Thanks so much for stopping by! I hope I you will want to make your own origami star garland.


Supplies:
Pebbles – Merry Little Christmas Collection – 6 x 6 Paper Pad


~Marcia

Monday, June 24, 2019

USS Missouri - Pebbles

Hello blogging friends.

Today I am kicking off patriotic week at Pebbles. I pulled lots of red, white, and blue pattern papers from the Oh Summertime, Chasing Adventures, and Big Top Dreams collections and created a layout about a visit to the USS Missouri battleship in Pearl Harbor Hawaii. Because I had little in the way of patriotic embellishments, I wanted to make the pattern papers work for me by using a digital cut file I designed myself and creating a fun banner with the Jen Hadfield Banner Punch Board.


That dark blue pattern paper makes a bold statement as my background with the die cut stars don't you think. To add dimension, I created a festive banner with my Banner Punch Board. I machine stitched these triangles together. I made it a little easier to work with the banner.


Other embellishments were kept to a minimum. The ship in a bottle from the Chasing Adventures collection was the perfect touch, layered on top of a tag.


I used some older Thickers I had in my stash for my title and added a few journaling strips below my banner.


If you are interested in watching my process while creating this layout, check out my YouTube scrapbook process video.


There is a lot you can do with just your pattern papers and the right tools! Thanks so much for stopping by today.

Supplies:
Chasing Adventures Collection – papers and ephemera
Oh Summertime Collection
Big Top Dreams Collection
Thickers - Memo Newsprint
Banner Punch Board


~Marcia

Thursday, January 21, 2016

Basic Grey Dear Heart Banner and Xyron

Hello blogging friends!

I am sharing a wedding idea today. When my daughter got married she wanted a vintage suitcase to hold the cards guests brought. I made a banner to hang on the suitcase so people would know the suitcase was for cards. It was perfect for her retro themed wedding.  Well, I've had a request to borrow the suitcase for another wedding ... I decided to make a new banner for the bride so she could keep it. I used the soft and romantic Dear Heart collection from Basic Grey and my Xyron adhesive.


I just tied the ends of the ribbon on the suitcase clips for display. This suitcase was slightly larger than a laptop bag if that gives you an idea for size.


Let me show you how I created the banner.

Supplies:
Silhouette Cameo
Digital file for the banner
Hole Punch

Step 1.  I found a banner in the Silhouette On-line Store and cut out enough for 5 pennants.


Step 2.  I ran the pink pieces and green scallop pieces though my new Xyron 9" Creative Station.


Step 3.  After adhering the pink pennants on top of the scallop base piece, I punched 2 holes at the top.


Step 4.  Weave a long piece of ribbon through each hole, leaving lots of length on both ends for hanging.


Step 5.  Adhere the green scallop border at the top over the ribbon.


Step 6.   Take a piece of white cardstock slightly wider than a small doily die and run it through a Xyron 3" Sticker Maker. I love taking these with me on crops!


Step 7.  Peel off the plastic sheet on top. Place your doily die on top and run through your die cutting machine.


Step 8.  Peel the doily off it's adhesive sheet and adhere to the banner. I love that if I apply the adhesive first and then die cut, I have no adhesive residue to clean up in the doily holes. Now place a letter sticker in the middle. Embellish with other stickers if you like.


Here is what my suitcase looks like closed. It was originally a blue suitcase. I spray painted it black. The inside was also blue and not very pretty looking. I applied some gold contact paper inside to cover up the blue and added a few stick on gems.


Thanks for stopping by today. Be sure to check out the Xyron Facebook page all week to see what our other designers have been making. 


Wednesday, September 23, 2015

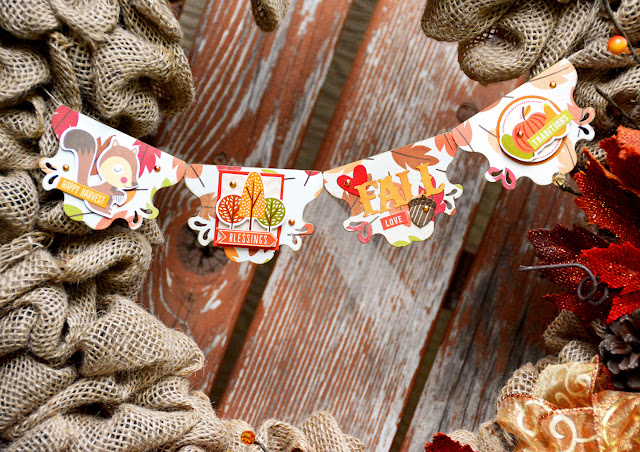
Autumn Blessings Fall Wreath Decor - Imaginisce and Top Dog Dies

Hello blogging friends!

It's definitely feeling like Fall in Minnesota already! The weather is cooler and I've had a hankering to do some Fall decorating. I decided my front door needed a new wreath. I love the look of burlap wreaths and decided to give it a go and make one myself, This was much easier than I anticipated. There are some great YouTube videos out there to show you how. This one I made took a couple of hours. Then I created a Fall banner with my Top Dog Dies the new Imaginisce Give Thanks collection to adorn my wreath. 


The banner was created with my Top Dog Dies Vintage A2 Mat die folded over a length of hemp twine. Then embellished with the Top Dog Dies Vintage Alphabet, Heart Mini Album Finishers, the new Pocket Page Fall die set, and embellishments from the Give Thanks collection. I love all the coordinating embellishments for this collection; the dimensional stickers, phrase stickers, puffy stickers, enamel dots, die cuts, and wood buttons. 


I used my i-Rock gem setting tool to adhere some metallic studs to my banner. I love the polished look the i-Rock gives any project. 


Some ribbon and fall foliage picks finish it off. I love crafting with ribbon. The i-Magicut Ribbon cutter is one of my favorite tools. It cuts and seals the edge of the ribbon all at the same time. Here is a tip to get a notched edge like I did for my wreath. Fold your ribbon in half before inserting into the cutter, angling the ribbon so the folded edge has more to cut away. 


Use a piece of hemp twine to tie the ribbon and fall picks onto the wreath.


Supplies:
Imaginisce : Pattern Papers, Die Cuts, Phrase Stickers, Dimensional Stickers, i-Rock, metallic studs, i-Magicut Ribbon Cutter, Foam Tape
American Crafts: Cardstock

 Have a great week! Thanks for stopping by today.

Monday, April 14, 2014

Hoppy Easter Banner - Imaginisce inspiration

Hello blogging friends. All week long Imaginisce is featuring Easter projects for you. I love the Welcome Spring collection. It is like a breath of fresh air after a long, cold winter (which is still trying to hang on here in Minnesota. More snow expected this week!)

I thought I needed more Easter decor in my house, so I wanted to create a banner. The die cuts from the Welcome Spring collection make it so easy to embellish. Add some May Arts Ribbon and some of this fabulous colored burlap from Celebrate It and voila....


Sorry, I am not showing you my banner hanging in my house, but it was just too dark to get a decent photo.
Here are some detail shots.


Supplies:
Imaginisce: Pattern Paper, Die Cuts (Welcome Spring), Foam Tape
May Arts: Ribbon
Cricut Expression
Cricut Cartridges: Art Philosophy and Birthday Bash
Adhesive: Tombow Mono Liquid Glue

Celebrate It: burlap

Be sure to check out the Imaginisce blog all week long for more Easter inspiration.

Wednesday, August 28, 2013

Cute As a Button - Scrap Town Lady Has Lost & Found 3!!

Happy Wednesday! Is it hot enough for you all? Staying inside with air conditioning, scrapping away, seems to be the perfect way to get through this heat wave. That and some ice cream!

I have a layout to share today that I created with the new My Mind's Eye Lost & Found 3 Oliver collection for Scrap Town Lady. These papers are rich in color and texture. My Mind's Eye does not disappoint with the 3rd Lost & Found release. Now there are some really lovely blues in this collection too, but I choose to stick with the gorgeous yellows for this photo of my niece. Isn't she as "Cute as a Button"!


Now with that title, how could I not use this die from My Favorite Things. I love this button border. I cut it first from box board, and then from pattern paper, adding another layer of paper buttons on top in a few places. Add some DMC floss and they look so real! Scrap Town Lady has DMC floss in the store now too.


I am using the banner die again this week as well. Banners are addicting and so easy to create with this die. I tucked a tag behind my photo for journaling.


Scrap Town Lady Supplies:
My Mind's Eye Lost & Found 3 Oliver Ledger Stripe
My Mind's Eye Lost & Found 3 Oliver Yellow Floral
My Mind's Eye Lost & Found 3 Oliver Lace Fan
My Mind's Eye Lost & Found 3 Oliver Collage
My Mind's Eye Lost & Found 3 Oliver Honey
My Mind's Eye Lost & Found 3 Oliver Garden Gate
My Mind's Eye Lost & Found 3 Oliver Element Chipboard Stickers
My Favorite Things Die-namics Button Border
My Favorite Things Die-namics Banner Day
My Favorite Things Die-namics Fancy Flourish
Distress Ink in Wild Honey and Tea Dye
Prima White Chalker ink
Glue Dots
Inkssentials Foam Shape adhesive
Scotch Quick Dry glue

Other Supplies:
Sizzix butterfly paddle punch
My Mind's Eye bakers twine
Bazzill cardstock
Silhouette (for the title)

Thanks for stopping by, Have a great day! I need to find myself some ice cream now, lol :)
~Marcia

Monday, November 26, 2012

Happy Holidays Banner - Quick Quotes inspiration

Happy Monday Quick Quotes friends! I hope you all had a great Thanksgiving. Marcia here to host the blog today. I am thinking about Christmas now. I wanted to make some home decor for the Holidays. A banner for my fireplace was just what I needed.
I used the elegant Cracklin Rose collection. I just love it's deep reds mixed with some white and black.
 Some dry embossing adds a little more texture for interest.
Quick Quotes Supplies:
Cracklin Rose 100, 300
Powderpuff Chalk Ink in Midnight Confession, Bloody Mary

Other Supplies:
Ribbon - Really Reasonable Ribbon
Hemp cord
Birthday Bash Cricut cartridge
Scorepal Scoreboard
black eyelets - Making Memories
Core'dination cardstock

Are you making anything for the Holidays?
~Marcia