Showing posts with label Daughter. Show all posts

Friday, April 20, 2018

On The Hunt - JustNick Studios

Hello blogging friends!

With Winter hanging on here in Minnesota and 2 feet of snow on the ground I was desperately needing some sunshine ... even if it was just on my layout. I decided to scrap some older photos of my daughter hunting for Easter eggs on a beautiful Easter morning. Spring = sunshine + flowers. I think I have everything covered on this layout I created for JustNick Studios. I am using the gorgeous Cocoa Vanilla Studios More Than Words collection.


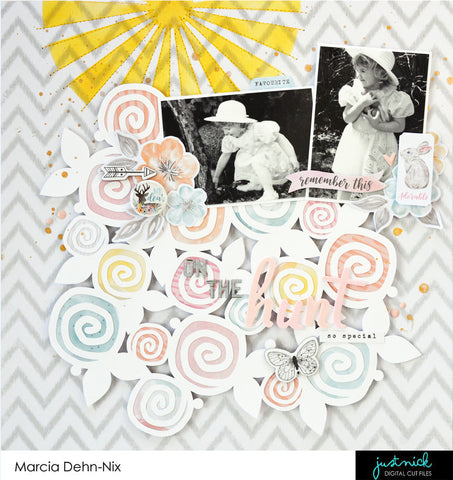
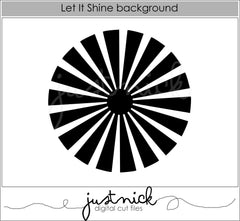
I love using a digital cut file as a stencil and decided to use the Let It Shine Background to create my sun. Some machine stitching added some texture and definition to the sun's rays.


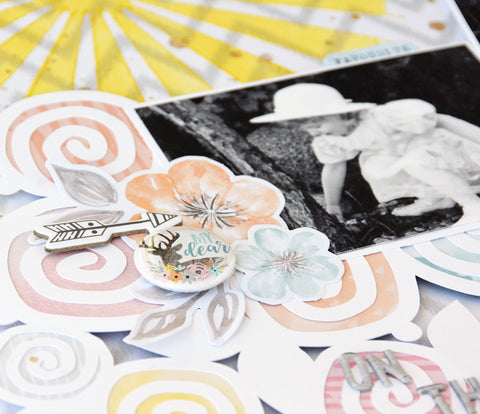
I used some soft pastel pattern papers to back the Scribble Floral Background. What an abundance of beautiful Spring flowers!


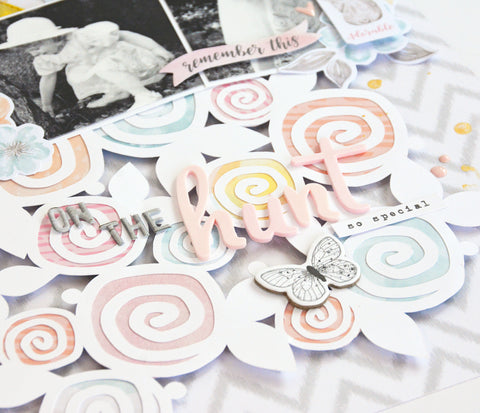
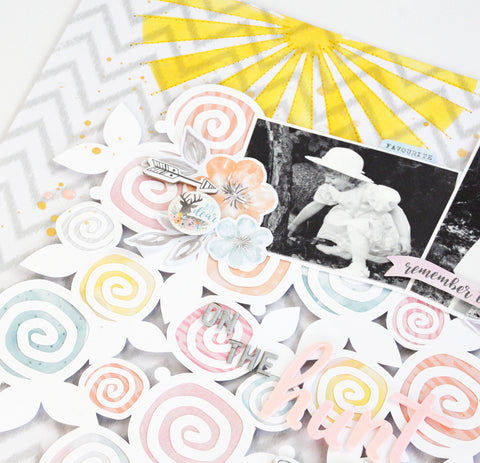
I love these pics. My Naomi was so adorable in her Easter dress and bonnet.


Here are the digital cut files I used today ...


If you are interested in watching my YouTube Process video here it is...


Thanks so much for stopping by today. I sure do hope Spring arrives here soon. Have a great weekend!

Saturday, September 17, 2016

Back On The Market and You Look Fabulous - Simple Stories

Hello blogging friends!

I am back today with some fabulous Reset Girl scrapbook layout inspiration. I really love the vintage elements. With the pinks and greens it's definitely perfect for scrapping your favorite girls. This collection really suits my daughter at the moment. She is in the process of resetting her life having just filed for divorce. This was not an easy decision for her to make and I have watched her struggle as she tries to find herself again. Slowly her confidence is coming back. She almost never takes selfies of herself but lately that has also been changing. I couldn't resist scrapping this one .... Back On The Market ...


I created my background by combining several different pattern papers. What is a girl to do when she can't make up her mind with so many beautiful pattern papers to choose from, I used a circle leaf frame cut file from JustNick Studios to frame my photo and then clustered embellishments all around it. Those birds are a definite favorite!


On the other side of the photo I placed a Library Pocket. These pockets are so fabulous for adding little journaling tidbits. You can also see a Reset Girl Metal Clip here. I added lots of machine stitching on this layout, some in brown and some in white.


I used the Sticker Alphas to create my title. I love that they look like typewriter keys. A little Washi Tape draws your eye to the title.


In the lower corner I layered Chipboard Stickers with some Bits and Pieces die cuts. I used the Reset Girl Roller Stamp for the "hey gorgeous" and the faux stitching.


I really love how this layout turned out.


My second layout also features this same daughter, only this photo was taken almost 10 years ago as she was having her hair done for her Senior Prom. I wanted to create a large title that once again showcased all the lovely pattern papers in the Reset Girl collection. Here is You Look Fabuous...


I created a quilted look on the background of this layout using another JustNick Studios digital cut file to create my quilt pieces and I machine stitched over the top ... lots of machine stitching! I strategically positioned patterned paper underneath in a few spots first.


The title was created using some of the Sticker Alphas, the Chipboard Sticker eyeglasses for the "oo" in Look, and by backing different pattern papers underneath the large digital die cut outline alphas I cut with my Silhouette. Some of the pattern papers I used come from The Reset Girl Simple Basics Kit. I could not resist using another of those fabulous birds to embellish with! 


Once again a Library Pocket holds my journalling. To highlight my photo I used more Washi Tape to frame it and another Metal Clip. The Word Label Stickers work so well on the tab Bits and Pieces die cuts.


Thanks so much for stopping by today!

Supplies Used:

~Marcia

Monday, June 13, 2016

Bloom & Grow - Simple Stories

Hello blogging friends

I am so excited to share a couple awesome Simple Stories layouts today using the brand new Bloom & Grow collection. I think I have a new favorite collection!! It combines my love of gardening with my love for paper. I just love those little gnomes to pieces. 

For my first layout "Bloom & Grow", I wanted to use a chicken wire background digital cut file and fill in the negative space with a variety of pattern papers. The prints are small enough on the 12x12 Bloom & Grow paper to make this possible. You could also use the 6x6 paper pad. This is a perfect way to use up scraps when you are nearing the end of playing with your papers. I added some stitching too for a little more texture. My animal loving daughter Colette is the little girl on this layout.


At the top of the page I used one of the 4x12 page elements. I love that Bloom & Grow graphic! I thought it would make a great title too. I gave it a little dimension by placing a chipboard sticker over the "&".


One of the those fabulous chipboard gnomes embellishes my photo. Those pink enamel dots work so well to give him a nose and make him look more life-like. There are the cuties little sayings as well. I couldn't resist the "chillin' with my gnomies".


More garden elements are clustered near the bottom of my layout along with another gnome. Isn't he is so adorable?


For my second layout "Be Happy", I decided to layer my pattern papers along with some die cut doilies to give my layout a country look. The woodgrain background paper adds a rustic feel and really shows off the delicate doily.


This adorable little bird and birdhouse make a nice cluster over the doily in the upper right. I couldn't resist adding a little jute bow here too,


The Simple Stories Bits & Pieces are fabulous for tucking under photos too. They are layered here with some Stickers, Chipboard, Enamel Dots, and oh so pretty Bradz.


I like distressing the edges of my papers slightly by rolling corners, or bending and tearing the edges. It helps to add dimension so your layout doesn't look so flat.


Thanks for stopping by today. Watch for both of the new Bloom & Grow and Sunshine & Happiness Simple Stories collections at your local scrapbook store. You will absolutely LOVE them!


Friday, June 3, 2016

You Are My Sun, My Moon, & All Of My Stars - Cocoa Vanilla Studios and Faber-Castell

Hello blogging friends!

Today, I am so excited to share a fun Cocoa Vanilla Studios Colour Me Happy layout with you today where I played with my Faber-Castell gelatos to create a bright mixed media background. My inspiration for this layout was this cut apart card with a quote I absolutely love; "You Are My Sun, My Moon, & All Of My Stars". I have really been enamored with using suns and or sunshine on my layouts lately. It is finally Spring in the USA where I live and after a long winter I am enjoying the sun! Here is my layout...

  YouAreSunMoonAllMyStars

I used a very simple technique to achieve my background. First paint gesso where you want to blend your Faber-Castell gelato colors. Once it is dry, pick out three or four colors. I went with 2 shades of yellow and 2 shades of orange on my layout. Then just scribble color over the gesso. You seriously don't need much. Wet your finger and spread the color where you want it blending with the other colors. I like using my finger because you really don't need much water. A paint brush holds too much water which might cause your paper to curl more. Want more color? then just add more scribbles and blend some more. The color is vibrant and it is so fun to see how beautiful the result is. After my color was applied, I used an embossing paste and a stencil to add the stars over the top.

 These awesome encouraging words of tiny text are also from the Colour Me Happy Cut Aparts.

  TinyText

I played up the sun, moons, and stars on my layout. I created a stitched garland with little suns and moons and added a lot of star sequins from the Tis The Season collection.

  ShinySequins

SunMoonStarsGarland

I did a little fussy cutting too with some of the floral pattern paper and layered one of the awesome Colour Me Happy flair buttons on top.

  DetailSun

Hello

I hope you will give this technique a try with some Cocoa Vanilla Studios Colour Me Happy and Faber-Castell gelatos. It is quick and easy, but most of all it is so fun!!

 Thanks for stopping by!
 ~Marcia

Thursday, May 15, 2014

She Said Yes! - Love My Tapes

Hello blogging friends. I have my first layout for Love My Tapes up on the blog today! I would love to have you stop over there and tell them I sent you. I received some fabulous rolls of washi tape, fabric tape, and lace tape to design with, but a couple rolls just jumped out for me. I got some engagement/wedding washi tape! I had the perfect photo for that washi tape too. I've been wanting to scrap this photo since Christmas when my daughter and her boyfriend announced their engagement. A special photo calls for special papers. I am using the Teresa Collins Santa's List collection, one of my all time favorite Christmas collections.


I have been having a love affair with vellum and sequins. I just can't help myself. Plus, check out this gorgeous washi tape! You can see that engagement/wedding washi in the first close-up and again in the lower left corner of my main photo (It says "Will you marry me?"). Perfect, Right! I also used an intricate black washi that had hearts in the middle. With the red and white, the pop of black really draws your eye right to that photo.


I used this sketch from Creative Scrappers. I love their sketches!


and guess what .....
I am joining the Creative Scrappers Design Team!!!!!  Somebody pinch me.


I am so looking forward to the weekend. Sunshine and no rain! Hopefully I will get my garden in.
Take care.

Friday, January 31, 2014

Fur-Ever Friend - Imaginisce

Hello blogging friends. I am sharing a layout I created for a Papercrafts Magazine call, but it wasn't picked up for publication. I used the Imaginisce Good Dog collection. This is my daughter Colette saying goodbye to one of our foster dogs. Jimmy lived with us a whole year before his fur-ever family adopted him. We had grown quite attached to him by then. Adult dogs who are black in color are the hardest to place. Most people want cute puppies. This guy loved to bury rawhide bones in my garden. I was still finding them 2 years later, lol.


So, now my daughter thinks she would like to own a dog. We are going to look at a few rescue dogs in the morning :)
Enjoy the weekend.
~Marcia

Friday, November 8, 2013

Caught on Film - ScrapTownLady

Happy Friday everyone!! I have a trendy new ScrapTownLady layout to share with you using the Carta Bella Hello Again collection. This collection reminds me of my oldest daughter. She is a writer, so she loves the typewriter paper. I thought I would scrap a couple of photos of her and her boyfriend from their summer roadtrip adventure. I am so glad friends went with them that took these pictures! See my daughter hates having her photo taken. I love the hearts and the bubble quotes in this collections too. Perfect for young lovers don't you think. Here is my layout ...


and a closer look ...


ScrapTownLady Supplies:
Carta Bella Hello Again Small Floral
Carta Bella Hello Again Triangles
Carta Bella Hello Again Friends Forever
Carta Bella Hello Again Hello Floral 
Carta Bella Hello Again Chit Chat 
Carta Bella Hello Again Typewriters 
Bazzill cardstock in Black  
My Favorite Things Die-namics Fishtail Flags  
Distress Ink in Pumice Stone
Glue Dots   
Scrapbook Adhesives Foam Squares  
Scotch Quick Dry Glue

Other Supplies:
Studio Calico arrows
Studio Calico camera wood veneer
Studio Calico Polaroid frames
Ideology Filmstrip transparency
vellum
Silhouette cut files
gesso
October Afternoon Sprinklers
Sukara Micron pen
Epiphany Crafts Heart punch

Enjoy your weekend!
~Marcia

Monday, October 14, 2013

Decking the Halls - Quick Quotes

Happy Monday! Marcia here to host the Quick Quotes blog today. I have a layout to share with you that I created with the new Happiness collection. This collections is full of bright cheery colors. When I saw this piece of paper that I used for my background, I thought Christmas lights. Yeah, I know, it's not even Halloween yet, lol. So, I went with my inspiration and did a Christmas layout. This photo of my daughter worked really well, since she is not wearing traditional Christmas colors, but purple (her favorite color!).


I used a couple of Quick Quotes Christmas chipboard pieces that I finished with some Creative Imaginations Inca Gold. I just rubbed it on with a damp (mostly dry) baby wipe. They turned out gorgeous!


Quick Quotes has lots of vellum quotes that are perfect so many occasions. I just had to use a Christmas quote on my layout.

NOTE: for a no show vellum adhesive, try Glue Dots vellum adhesive sheets. By far my favorite vellum adhesive!

Quick Quotes Supplies:
Happiness Pattern Papers
Powderpuff chalk in in Coal Miner
Christmas vellum quote, vellum Joy, Peace, Love (from Club Q last Dec)
Chipboard: tree (from Club Q last Dec), presents

Other Supplies:
Creative Imaginations Inca Gold Metallic Rub
Black cardstock
Washi Tape : Tim Holtz Idea-ology, Recollections, and Freckled Fawn
Martha Stewart Star punch all over the page
Sequins: Studio Calico
Silhouette; Lavanderia font
Glue Dots vellum adhesive sheets

Thanks for stopping by.
~Marcia

Friday, September 27, 2013

It's a Thrilling Halloween at Scrap Town Lady!

Happy Friday! I am really looking forward to this weekend. I need lots of RRR after picking up a bug from my daughter. and here I thought that flu shot was going to keep me from getting sick, lol.

I am so excited to share my Thrilling Halloween layout with you today. This Authentique collection is one of the best Halloween collections out there this year. Scrap Town Lady has the perfect Cheery Lynn die cuts to help you embellish it too. Today I am scrapping a picture of my daughter dressed as Spiderella. Who the heck is Spiderella anyway? She definitely had a Spooktacular costume though. Take a look ...


I got a little messy with my spray ink too :)   Now let me show you these dies up close ...
I love this clothesline with the witch's laundry hanging on it.


The bats were on a strip that I cut apart.


... and then there is this awesome spider web!


Scrap Town Lady supplies:
Authentique Thrilling Antidote
Authentique Thrilling Forewarn
Authentique Thrilling Frenzy Honeycomb Quilt
Authentique Thrilling Moonlit
Authentique Thrilling Superstition
Authentique Enchanted Spellbound
Cheery Lynn Designs Spider Web
Cheery Lynn Designs Going Batty (Coming soon, please check back in the store next week)
Cheery Lynn Designs Witch's Laundry (Coming soon, please check back in the store next week) 
Prima Chalker in Black Coal  
Scotch Quick Dry Adhesive 
Therm-o-web Zots Medium 
Glue Dots Mini 
Inkssentials Pop It Foam tape

Other Supplies:
Epiphany Crafts Hexagon punch and epoxies
October Afternoon Sprinklers in Comet Tail
Studio Calico Mr Huey's in Warm Calico
Cheesecloth
Cuttlebug Embossing folder
Computer font: Halloween Mirage
Core'dinations cardstock
hemp
buttons

Linking up with Paper Issues Halloween Hootenanny Issue.

I hope I inspired you to do some Halloween scrapping, or better yet shopping  :)
~Marcia