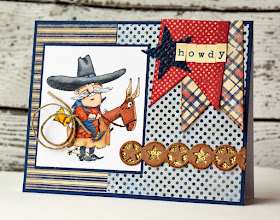
I had an opportunity this week to play with my Xyron adhesives and some fun Deep Red Stamps. I couldn't resist this Cowboy stamp since most of my husbands relatives are redneck cowboys. Check out the details at the bottom of my post to see how you can enter to win a $45 gift certificate from Deep Red Stamps!
I told you it was fun! I decided to make a gift ensemble.... a gift bag and a matching card...
I am thinking some BBQ gifts would be just the thing to put inside that bag! These Deep Red Stamps are awesome! I am no pro when it comes to coloring with my Copics, but this was fun and relaxing ... and I didn't think I did too bad, did I? The pattern papers are some Authentique Pride papers that I had in my stash.
I used several different techniques with the new Xyron 9" Creative Station. Let me show you.
Step 1. Stamp your cowboy images and color with Copics. I like to use a special Copic blending paper I bought at my local stamp supply store. I usually stamp and color several images so I can pick and choose my favorite color combinations.
Step 2. I wanted to add some burlap because I love it's texture. I decided to try die cutting it with some stars. It's easier to apply the adhesive to the burlap first and then die cut, so I ran the burlap and a few other die cuts (so I wouldn't be wasteful) through my Xyron Creative Station with the 9" permanent adhesive loaded.
Step 3. Remove the plastic from the top and create your die cutting sandwich. Run this through you die cutting machine.
Step 4. Select your pattern papers for your gift bag. I used my Xyron Mega Runner to adhere the base sheet to the front of my bag.
Step 5. I die cut some other fun things, like a barbed wire fence and a star border. I wanted to add some glitter to the star border, so I ran it through my Xyron 1.5" Sticker Maker upside down. The other die cuts went in right side up.
Step 6. Now pour the glitter on top of the adhesive on the die cut. Press it firmly with a finger. Shake off excess.
Step 7. Adhere the top of the die cut over the glitter and run it through the Sticker Maker one more time.
Step 8. Carefully peel off the paper backing of the burlap stars and adhere to bag front along with the other die cuts. I fussy cut this cowboy out so I wouldn't cover up too much.
Step 9. I added a few flag banners. Here is a trick for cutting the notches ...
Step 10. Some sticker alphas and twine finish it off..."Yee Haa!"
Step 11. Now we are ready to cut some pattern papers for our card. Mount your stamped and colored image onto cardstock. Since I wanted the card to coordinate, I used some of the same dies here.
Step 13. Adhere the card front pieces to the card base and the stamped image on top.
Step 14. Add some more flag banners in the upper corner along with another burlap star and alphas "Howdy"
Step 15. The star border die cut was placed underneath the banners and I added twine here too. The Xyron adhesive dots work great for holding the twine in place.
Yeah! You made it to the bottom of my post... leave a comment and I will select one winner on Monday, November 9th. For another chance to win .... follow me on Instagram and leave me a comment on my giveaway post there.
Thanks for stopping by.
~Marcia


WOW!!! I LOVE both of these, very creative, great colors, papers, coloring and so beautifully done. The blue stars are real eye catchers. Thank you for the great giveaway.
ReplyDeleteSue
http://suek86401.blogspot.com/
Adorable gift set....love your step by step instructions....Thanks for the inspiration!!!
ReplyDeleteWhat a fun project! I love all the details you added to make it extra special!
ReplyDeleteYour gift bag and card are great! What a nice set for the special guy for Father's Day or a birthday!!
ReplyDeleteOMG, I love this cowboy! Just discovered your blog through a google search because of one of your features in Scrapbook & Cards Today!
ReplyDeleteLove the cowboy stamp, great projects.
ReplyDeleteI love the cowboy stamp! I've been watching all week and I'm learning so much. Your step by step instructions help a lot and I love all your projects so very much!!!!
ReplyDeleteThat is really cool, I recently got a Mega runner and I love it. I just found Deep Red so I'm trolling around looking at all the cool links on their page. Great project, If you don't mind I'd like to link to this from our blog and message board in a future post.
ReplyDeleteThank you Crafting Circle. I am glad you like my projects. You may share with your readers. Extra traffic to my blog is always appreciated.
Delete